If you’re craving takeout, try this easy, one skillet beef bulgogi recipe from our friends at Paleohacks for sweet and spicy flavor with zero soy, MSG, or preservatives!
Bulgogi is a popular Korean recipe that translates literally to “fire meat.” Super thin slices of strip steaks, sirloin steak, or ribeye are marinated in spices until tender, then grilled or pan-fried. The result is a sticky, crispy, and slightly spicy recipe that can be turned into a complete meal with a side of cauliflower rice or stir-fried veggie noodles.
The unique marinade includes ripe, grated Asian pear for sweetness, texture, and tang. The acidity in the pear also helps to tenderize the meat. If you can’t find Asian pears, a traditional pear will work just fine. To add a subtle spice to the marinade, use gochugaru, the bright red Korean red pepper. This powder is less spicy than cayenne and creates a balanced heat that lets the other flavors shine through.
Coconut sugar stands in for brown sugar, adding sweetness and helping to crisp the steak for delicious texture. Finally, toasted sesame oil adds nutty aroma while ginger, garlic, and coconut aminos add even more flavor and dimension.
To make the bulgogi, mix all the ingredients for the marinade together, add to the sliced beef, and refrigerate for at least two hours. Then, grease a medium skillet with avocado oil—not olive oil. Avocado oil has a high smoke heat point that can withstand high cooking temperatures without burning. Cook the steak about two minutes per side, in two batches.
To serve, top the hot steak slices with sesame seeds and scallions, and enjoy!
1. Combine ingredients for marinade in a mixing bowl and stir well.
2. Add steak slices and stir to coat. Cover and refrigerate 2 to 4 hours.
3. Grease a skillet with avocado oil and heat over medium-high heat for a few minutes. When hot, use tongs to add half of the marinated steak strips and cook for 2 minutes. Flip and cook an additional 2 minutes.
4. Transfer steak to a bowl and repeat with remaining strips.
5. Serve the beef bulgogi hot garnished with sesame seeds and green onion.
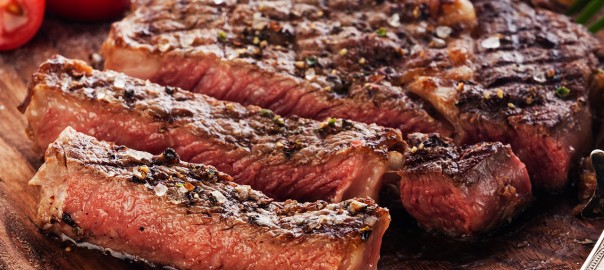
Ribeye steak is one of the most delicious of all the cuts of beef that we — as steak lovers — want to grill and eat every time we spark up the grill.
The reason for our ribeye obsession is that it is so tender and tasty; and, it is mouthwatering-good when grilled with just kosher salt or sea salt and fresh ground black pepper for seasoning. The reason ribeye steak is a true beef flavor bomb is that it has more marbling — the fatty connective tissue within the muscle — than most other cuts.
Even grass-fed and grass-finished ribeye steaks — which are usually less fatty than corn-fed and grain-fed factory farm beef — has just enough of that good fat marbling to make the steaks savory and full of that great grass-fed beef flavor we love.
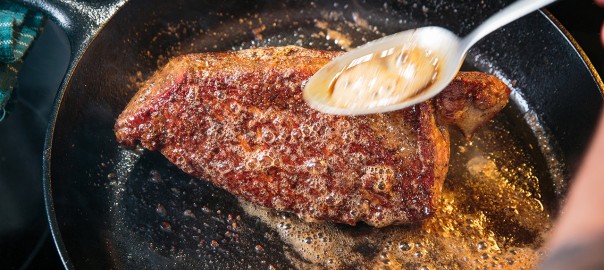
And while ribeyes are perfect steaks to cook with an oven — they are great when lightly seasoned and seared on a hot skillet with a bit of olive oil or unsalted butter — we prefer the simple pleasure of a perfectly cooked ribeye from the grill.
Head ButcherBox Chef Yankel Polak is a huge fan of the ribeye steak. Chef Yankel says, “Cast iron or open fire. Finish it with butter and tons of salt. Even the best ribeye will taste underwhelming if not seasoned properly.”
What gives ribeye steaks such great marbling? They come from the rib primal of a cow, specifically, the longissimus dorsi, which gets very little use, hence the excess fat dispersed throughout the muscle. But in a grass-fed ribeye steak, that fat is a bit healthier than in a grain-fed or corn-fed ribeye.
The fattiness burns up when being cooked adding a juicy moisture to the meat, making it incredibly tender. Once you eat a grilled ribeye, you will definitely notice its smooth, rich texture and delicious beefy flavor. When cooked on an open flame, charred lightly and medium-rare in the middle
According to Chef Yankel, “Ribeyes have a ton of fat so super high heat is the best way to get the most flavor.” When cooking on an open flame, char a ribeye lightly on each side — a few minutes on each side — and then let it sit for eight to ten minutes before cutting into. Follow these instructions and you will get a perfect medium-rare steak every time.
Season steaks generously on both sides with salt and pepper.
Preheat grill. If using an open flame, wait for flames to die down. Right before grilling, make sure grill surface is extremely hot, then rub it down with an oil-soaked rag – we advise using tongs to hold the rolled-up rag.
Rub heads of garlic with olive oil, 1 tsp kosher salt, and 1 tsp fresh black pepper and wrap in aluminum foil.
Bake garlic for about 30 minutes on the cooler side of grill – indirect heat.
Once baked, peel the skin off garlic and place in food processor with ghee. Pulse to make a paste.
For medium-rare, place ribeye steaks at 45° angle across hottest part of grill grates, then grill for 2 – 3 min per side, while rotating 90° every 1 ½ min.
Place steaks on a baking sheet and smear 1 large Tbsp of garlic paste on top of each steak.
Move steak to the cooler part of the grill, then grill for 4 min per side. Keep your meat moving to ensure that it cooks evenly. Remove from grill when a meat thermometer inserted into thickest part reads 120°F.
Bacon has been around for a long time. In fact, the earliest recorded examples of the cut date back to 1,500 B.C. The fatty back or belly of pork was popular with the Greeks and Roman, the latter who cooked it with figs and flavored with pepper.
Breakfast meat history
What we know as bacon today is not precisely what has been traditionally known as bacon or bacoun. In much of Europe, the word bacon was used as a synonym for all pork. The word bacon and its earlier formbacoun were derived from French, German, and Teutonic versions for “back.”
The form of salt-cured and sliced bacon we know in America today is much different from its earlier forms and is known as “streaky” bacon in the United Kingdom.
Bacon became a common dish in England starting in the 17th century. According to the Oxford Companion of Food, bacon, especially smoked bacon and extra-fatty bacon was a staple for almost everyone except the very poor across the British Isles. In fact, many families would keep their bacon in a prominent place in the home as a point of pride. For centuries, Bacon grease was a common cooking fat, which remained true until the mid-twentieth century when bacon fat was replaced by olive oil, vegetable oil, and other fats not derived from meat.
Modern bacon
Today, Wiltshire in England remains one of the world’s bacon-producing centers; Wiltshire has been the center of the bacon universe since John Harris set up the first large-scale bacon curing business there in the 1770s.
The modern, American version of bacon was an innovation of butcher and manufacturing. At the turn twentieth century, the meat industry moved away from salt-curing and smoking bacon, and found it more affordable to sugar-brine pork belly at a large scale. Before 1915, bacon was still sold as a solid hunk of meat — usually four pounds — and people cut bacon into smaller pieces in the home.
Until the 1960s, bacon maintained its reputation as being a “country” cut of pork, a holdover from its English peasant popularity. As wet-cured, pre-sliced bacon became easier to package, it appeared more readily in stores and — due to its sweet and salty flavor — found its ways to the breakfast plates of many Americans as the perfect companion to fried eggs.
There is dark brown sugar candied bacon, maple bacon, applewood smoked bacon, turkey bacon, and even, shockingly, meatless veggie bacon.
These days, you can find bacon cheeseburgers almost anywhere someone is making burgers, and it is especially useful — to add some fatty flavor — to lead cuts of beef like filet mignon. Bacon appears everywhere from donuts to ice cream to cocktails — in the form of sweet bacon candy — and can even be made into a form of bacon jam.
Our Head ButcherBox Chef, Yankel Polak, has devised an ingenious bacon jam recipe that he thinks is best used when added to a cheeseburger. It could also be added to grilled cheese or mixed in with roasted and mashed potatoes, pasta, or scrambled eggs.
Is your mouth watering yet?
Without further ado, here is Chef Yankel’s famous burger recipe featuring his own unique homemade bacon jam recipe featuring maple syrup, brown sugar, coffee, and Guinness.
Chef Yankel’s “Epic Burger With 15 Ingredient Homemade Bacon Jam”
Total time: 1 hour and 15 minutes
Prep time: 60 minutes
Cook time: 15 minutes
Ingredients:
4 ButcherBox Burgers or ButcherBox Ground Beef molded into 6oz burger patties
Bacon Jam
1 pack (10 oz) ButcherBox Bacon, roughly chopped
½ onion, diced
3 Tbsp brown sugar
3 garlic cloves, minced
¼ tsp cayenne
1 tsp cinnamon
½ tsp nutmeg
¼ c bourbon
3 Tbsp cold brew coffee
3 Tbsp Guinness
3 Tbsp sherry vinegar
3 Tbsp balsamic vinegar
¼ c maple syrup
¼ c ketchup
Onion Rings
1 red onion, sliced and separated
1 c buttermilk
1 Tbsp smoked paprika
1 Tbsp garlic powder
1 Tbsp chipotle powder
1 tsp kosher salt
1 c cornstarch
2 c peanut oil
Truffle Mayo
½ c mayonnaise
2 Tbsp truffle puree (or truffle oil)
salt and black pepper to taste
Fixins
salt and black pepper to taste
2 Tbsp ghee
4 thick slices sharp yellow cheddar
4 leaves butter lettuce
4 large tomato slices
4 sesame hamburger buns
Directions:
1. Place bacon in a cold Dutch oven on medium heat (starting cold renders the fat better). Cook bacon until crispy, then drain half the bacon fat. Keep the other half in the pan.
2. Add onions to bacon and sauté. Once onions are translucent, add nutmeg, cinnamon, cayenne, garlic cloves, and brown sugar. Stir until sugar has melted.
3. Add bourbon, coffee, Guinness, sherry vinegar, balsamic vinegar, and maple syrup. Simmer on medium heat until liquid is reduced by half.
4. Remove from heat and let cool at room temperature for 5 min. Place mixture in food processor, add ketchup and pulse to a chunky jammy texture. Refrigerate for up to 30 days or freeze up to 6 months.
5. Soak red onion slices in buttermilk for 30 min.
8. Coat onion slices evenly with the spice mix and fry gently for 2 min or until golden brown. Let rest on a paper towel-lined plate to drain excess oil.
9. Mix mayo, truffle puree and salt and black pepper. Refrigerate until needed.
10. Bring burgers to room temperature and season both sides with salt and pepper.
11. Preheat a large skillet (preferably cast-iron skillet) and add 2 Tbsp ghee. Once the ghee is hot, sear burgers for 3 min on one side. Flip burgers, place cheddar on the burger and sear the other side for three more min or until desired doneness.
12. Spread truffle mayo liberally on both sides of the bun. Place lettuce leaf down first (to protect the bun from burger juices), followed by tomato.
13. Place burger on top of tomato followed by a healthy dollop of bacon jam. Top with onion rings and close that baby up! Be sure to let us know how it went!
Whenever I come across braised short ribs on a restaurant menu, I have a hard time passing up the delectable dish. Just thinking about it, I can taste the melt-in-your-mouth, flavorful meat. In all my short rib adventures, I’ve never stopped to wonder how chefs create such divine creations.
The secret, I discovered comes down to braising.
A cooking method mixing high dry heat, low moist heat, and time
Braising is a two-step cooking method that uses both high-heat for a short period and low-heat for a longer period of time. First, it involves browning meat in olive oil, butter, ghee, or some other fat — on high heat — usually by sauteing in a pan. Second, the meat is cooked in a covered dish, in the juices left from the browning and often also with an added liquid such as stock, water, etc.
The second, slow-cooking step is done in a tightly covered pot, like a dutch oven, or, often, in a slow-cooker. This process is also sometimes referred to as “pot roasting.”
Slow-cooking — and, well, the use of a slow-cooker or Crock Pot — helps to add flavor and tenderizes tougher cuts of beef and other meats.
According to The Kitchen Encyclopedia, published in 1911, “Braising is a method much used in France, and is a cross between boiling and baking.” The word itself derives from the French word brasier, which is a form of braise, meaning “live coals.” A brasier or brazier, in French and English, is also another name for a receptacle to burn coal or charcoal. Dutch ovens can also be called brasiers. The origin of the term braising seems to come from a French word for a method using both dry heat and moist heat.
Why braise?
Braising can be done with any meat but is most often done with tough cuts of meat, because tender cuts usually don’t need additional tenderizing or flavor.
Cuts that traditionally have less flavor — say a chuck roast, shoulder steak, chuck pot roast, pork butt, or beef chuck arm — are the best cuts to use and may need richer braising liquids. The best way to add great flavor is with beef broth or chicken stock, as well as spices like rosemary, bay leaves, and other fresh herbs. Moreover, braising done in the style of a pot roast can include aromatic vegetables — carrots, onions, and more — for additional flavor.
How to braise meat
The first step of braising takes about ten minutes, but achieving truly fall-apart-tender meat takes many hours of cooking time. Our in-house ButcherBox Chef Yankel Polak recommends seasoning the meat with salt and black pepper, then searing your meat until you get a nice brown crust. When cooking pork, he likes to use apple cider as a braising liquid that can also help scraping the browned bits of meat left from searing. Chef Yankel also recommends adding tomato paste to your braising liquid for texture and taste. For added flavor and simplicity, he also advises using the same pot to sear and cook, covering the dish after the flavorful liquid and browned meat have simmered.
A long, slow cook is crucial for breaking down the proteins and tenderizing the meat. You’ll need to cook for at least an hour and a half to two hours (depending on the size of your cut of meat) in the oven set to 300 degrees. Cooking on low heat allows the meat to cook slowly as the braising liquid evaporates. It is this process that makes dishes like pulled pork, carnitas, and roasts fork-tender.
Whether cooking pork in the slow cooker or keeping a watchful eye on a roast spending a day in a Dutch oven, meat braising in its juices and spiced-up flavor can turn a simple cut of beef or pork into a truly amazing dish.
If you want more from Chef Yankel, check out his recommendations for the best red wine to pair with braised beef and other dishes.
Our monthly ButcherBox comes often comes with cuts like pork butt and grass-fed beef roasts that are perfect for braising. You can also get these cuts in a custom ButcherBox. If you’re not a member already, you can sign up here.