Tag Archives: high heat

An easy Bulgogi Beef Skillet recipe from Paleohacks

If you’re craving takeout, try this easy, one skillet beef bulgogi recipe from our friends at Paleohacks for sweet and spicy flavor with zero soy, MSG, or preservatives!

Bulgogi is a popular Korean recipe that translates literally to “fire meat.” Super thin slices of strip steaks, sirloin steak, or ribeye are marinated in spices until tender, then grilled or pan-fried. The result is a sticky, crispy, and slightly spicy recipe that can be turned into a complete meal with a side of cauliflower rice or stir-fried veggie noodles.

The unique marinade includes ripe, grated Asian pear for sweetness, texture, and tang. The acidity in the pear also helps to tenderize the meat. If you can’t find Asian pears, a traditional pear will work just fine. To add a subtle spice to the marinade, use gochugaru, the bright red Korean red pepper. This powder is less spicy than cayenne and creates a balanced heat that lets the other flavors shine through.

bulgogi-beef

Coconut sugar stands in for brown sugar, adding sweetness and helping to crisp the steak for delicious texture. Finally, toasted sesame oil adds nutty aroma while ginger, garlic, and coconut aminos add even more flavor and dimension.

To make the bulgogi, mix all the ingredients for the marinade together, add to the sliced beef, and refrigerate for at least two hours. Then, grease a medium skillet with avocado oil—not olive oil. Avocado oil has a high smoke heat point that can withstand high cooking temperatures without burning. Cook the steak about two minutes per side, in two batches.

bulgogi-beef

To serve, top the hot steak slices with sesame seeds and scallions, and enjoy!

If you’re craving more takeout recipes but don’t feel like cooking, check out one of these 13 totally Paleo meal delivery options!

Paleohacks’ Korean-style BBQ Bulgogi Beef Skillet

bulgogi-beef


Prep time- 10 minutes

Cook time- 10 minutes

Chill time- 4 hours

Total time- 4 hours, 20 minutes

Serves- 4

Tools

Mixing bowl

Skillet

Tongs

Ingredients

bulgogi-beef

For the Marinade

1/3 cup grated Asian pear, peeled

1 T Korean red pepper (or chili powder)

1 T coconut sugar

1 T lime juice

2 T toasted sesame oil

2 T coconut aminos

1 clove garlic, minced

1/2 t ground ginger

1/4 t sea salt

For the Steak:

2 10-oz strip steaks, thinly sliced

1 t avocado oil

1/2 t sesame seeds, for serving

1/4 cup chopped green onion, for serving

Directions

1. Combine ingredients for marinade in a mixing bowl and stir well.

2. Add steak slices and stir to coat. Cover and refrigerate 2 to 4 hours.

3. Grease a skillet with avocado oil and heat over medium-high heat for a few minutes. When hot, use tongs to add half of the marinated steak strips and cook for 2 minutes. Flip and cook an additional 2 minutes.

4. Transfer steak to a bowl and repeat with remaining strips.

5. Serve the beef bulgogi hot garnished with sesame seeds and green onion.

A taco-stuffed sweet potato? Another great recipe from Paleohacks

The great recipe team at Paleohacks has shared another tasty dish with Roam. This Mexican-inspired recipe features sweet potatoes stuffed with taco meat and topped with homemade guacamole for a single serving meal everyone will love!

Ditch the tortilla and stuff your favorite taco fixings inside tender roasted sweet potatoes for a filling and guilt-free meal.

Tacos are a dinner staple that everyone can agree on. However, when following a Paleo lifestyle, tortillas can be difficult to replace. Traditional tortillas and other grain-filled foods can cause bloating, which is why sweet potatoes are such a great alternative. Plus, they’re big enough to stuff with drool-worthy toppings for a fun twist on taco night.

Grass-fed ground beef carries the smoky taco spices, like cumin, onion powder, and chili powder. A little tomato paste adds to the tangy zip. And as we all know, no taco is complete without a scoop of creamy guacamole. This one is kept simple with chopped onion, cilantro, and jalapeños so you can mash it together while the meat sizzles on the stove.

stuffed sweet potatoes

Get started by greasing the sweet potatoes with avocado oil, which helps to lightly crisp up the skins. Bake for one hour, then let the sweet potatoes cool at room temperature while preparing the other ingredients.

Meanwhile, heat ground beef in a skillet until browned, then stir in dry seasonings, tomato paste, and a little water. Cook about five minutes more.

While the taco meat cooks, make the guacamole by mashing an avocado until just slightly chunky. Add red onion, cilantro, sea salt, and jalapeños.

When everything’s ready, slice the sweet potatoes lengthwise and fill it up with taco meat. Top with a scoop of guacamole and finish with freshly diced tomatoes. Enjoy it while it’s hot!

stuffed sweet potatoes

Other great toppings to include:

  • Pickled jalapeño
  • Diced mango
  • Sliced radishes
  • Chopped bell pepper 

Tip: Try baking up a few additional sweet potatoes so you can have these decadent sweet potato brownies for dessert!

Taco-Stuffed Sweet Potato 

Prep time- 10 minutes

Cook time- 1 hour, 15 minutes

Total time- 1 hour, 25 minutes

Serves- 4 

Tools

Parchment paper

Baking sheet

Skillet

Spatula

Small bowl 

Ingredients

stuffed sweet potatoes

4 sweet potatoes

1 T avocado oil

1 lb ground beef

1 T ground cumin

2 t chili powder

1/2 t garlic powder

1/4 t onion powder

1/4 t cayenne pepper

2 T tomato paste

1/4 cup water

1 medium ripe avocado

2 T red onion, chopped

1 T cilantro

1 T minced jalapeños

1/4 t sea salt

1/2 cup tomatoes, diced

Directions

1. Preheat oven to 350ºF and line a baking sheet with parchment paper.

2. Grease the outsides of the sweet potatoes with avocado oil and set on the prepared baking sheet. Bake for 1 hour, then let cool.

3. Meanwhile, heat ground beef in a skillet over medium heat, using a spatula to break up the meat. Cook 10 minutes, stirring occasionally.

4. Stir in dry seasonings, tomato paste, and water until thoroughly combined. Continue to cook for 5 minutes.

5. While the taco meat cooks, prepare the topping: Mash an avocado in a small bowl. Add the chopped red onion, cilantro, jalapeños, and sea salt. Stir well.

6. When the sweet potatoes are cool enough to handle, slice them down the center lengthwise. Stuff with the taco meat, then add a scoop of the guacamole and diced tomatoes and serve.

If you liked this recipe, then you’ll love this sweet potato cheeseburger casserole recipe that you can make with just one pan.


steak

The ultimate guide to steak

Meaty, beefy, juicy — steak is an American classic. 

With so many varieties and cuts of steak, though, it can be hard to know what sets each cut apart. What’s the difference between top sirloin steak, for example, and NY strip steak? Why are ribeyes and porterhouses so widely regarded in the culinary world? What’s the difference between skirt steak and flank steak, and how do you slice those thinner cuts?

This guide demystifies the world of steak and gives you the knowledge and tools to expertly prepare any kind of steak at home. From Philly cheese steaks whipped up with shaved steak to a decadent sauce-doused filet mignon, you’ll know exactly what you’re doing when preparing either. 

ButcherBox members receive many of these steaks in their monthly box. If you would like to sign up to get grass-fed, grass-finished beef delivered to your door, click here.

Top Sirloin Steak

Cut close to the round primal section of the cow, top sirloin steak is incredibly versatile. It’s rich like a roast but shares the texture and mouthfeel of a steak. You can grill it up to be served on its own or cube it and add it to stews and soups. It’s an economical cut of steak, making it great for everyday meals. Give this jerk-rubbed top sirloin with mofongo a try for a hearty, spicy meal.

Steak Tips

Incredibly tender, premium steak tips can be cut from tri-tip, coulotte, and sirloin. More pedestrian cuts come from various muscles but need a bit more help to be made into tender and juicy meals. They’re robust and meaty, and, at roughly one-inch a square, they make for some delicious hunks of meat. Try these braised in a soup or stew, or as full-flavored kebabs like this Dijon garlic smoked sirloin kebab dish.

Skirt, Bavette, and Flank Steak

Both skirt steak and flank steak are long, flat, and flavorful, while bavette steak is finely textured and flat. True bavette steak is hard meat cut to find in the U.S., despite its popularity across the pond. Flank steak is taken from the flank primal and is generally cut whole, and not divided into smaller portions. Skirt steak packs an even beefier flavor than flank steak, due to its connective tissue and fat content. Skirt steak is the default choice for fajitas, while flank steak responds well to marinating and grilling. Make sure to slice both thinly against the grain. For a good flank steak recipe, give this cilantro lime hickory grilled flank steak a try.

Shaved Steak

Looking to whip up a Philly cheese steak or a stir fry? Shaved steak is the ideal cut. Trimmed from the rib section, shaved steak is tender and full-flavored. It’s quick on the stove due to its thinness and pairs well with robust marinades.

New York Strip Steak

A favorite of steakhouses the world over, the New York strip steak can be cut thin or thick. It’s well-marbled and extremely tender, as it’s cut from the short loin, a rarely used muscle on the cow. The strip steak is a cut of beef that requires little more than a simple seasoning and a solid technique. Grill it, pan-sear it, or roast it—whatever you do, use lots of butter or even garlic butter. Enjoy this coffee-rubbed New York strip steak with berry sauce and parsnip mash for a well-rounded meal.

Ribeye Steak

The ribeye is a ButcherBox member favorite. Cut from the center of the rib section, it is smooth, rich, super beefy, and has significant marbling. Ribeyes respond well to an open flame due to their healthy fat content. Char them lightly and cook them until medium-rare. Here is a simple, sultry pan-seared ribeye recipe.

Ranch Steak

Ranch steaks are very lean—they’re trimmed of virtually all fat and cut from the shoulder muscle. They possess a distinct earthy flavor, in case you needed a reminder that they are indeed grass-fed. Due to the lack of fat, this steak can become tough if overcooked, so it’s best to aim for medium-rare. If you’re in the mood for something different, enjoy the caramelized and salty flavor of these honey and sea salt ranch steaks with rainbow carrots.

Denver Steak

While the term Denver steak has only been applied to this cut in recent years, a similar steak is called the zabuton by the Japanese due to its similarity to a plush seating cushion. It’s extraordinarily marbled and tender, coming from the same muscle section as the ribeye. It responds well to Asian flavors, like in this miso Denver steak recipe.

Filet Mignon

Famously fancy, filet mignon is a buttery, tender cut of beef. They come from the center of the tenderloin and are silky smooth in texture and mild in flavor. Grass-fed cattle are unique in that they produce filets with rich marbling and depth. Given their mild flavor, filet mignons hold up to decadent sauces like cream sauces or balsamic glazes. Date night? Here is the perfect filet mignon meal for two.

Flat Iron Steak

Flat iron steak comes from an area of the cow that is notorious for its tough, sinewy texture. However, researchers discovered a way to access the most tender section for a lean steak with rich marbling. Cut from the shoulder, it’s got a deep, meaty flavor and cooks up quick. Try it with a full-bodied sauce like a red wine glaze. Here’s a tasty pepper crusted flat iron with root vegetable mash.

Porterhouse

The king of T-bones, a porterhouse is actually two steaks in one, consisting of a large NY strip on one side, and a filet mignon on the other. Fun fact: The tenderloin portion must be at least 1 ¼ inches thick to earn its namesake. Given its thickness, a porterhouse should be seasoned liberally, producing a thick crust of kosher salt and fresh ground pepper. Here’s a recipe for the perfect porterhouse steak with herb butter.

steak

ribeye-steak

The ribeye steak – There is no better grilling steak

Ribeye steak is one of the most delicious of all the cuts of beef that we — as steak lovers — want to grill and eat every time we spark up the grill.

The reason for our ribeye obsession is that it is so tender and tasty; and, it is mouthwatering-good when grilled with just kosher salt or sea salt and fresh ground black pepper for seasoning. The reason ribeye steak is a true beef flavor bomb is that it has more marbling — the fatty connective tissue within the muscle — than most other cuts.

Even grass-fed and grass-finished ribeye steaks — which are usually less fatty than corn-fed and grain-fed factory farm beef — has just enough of that good fat marbling to make the steaks savory and full of that great grass-fed beef flavor we love.

And while ribeyes are perfect steaks to cook with an oven — they are great when lightly seasoned and seared on a hot skillet with a bit of olive oil or unsalted butter — we prefer the simple pleasure of a perfectly cooked ribeye from the grill.

“ribeye-steak”

Head ButcherBox Chef Yankel Polak is a huge fan of the ribeye steak. Chef Yankel says, “Cast iron or open fire. Finish it with butter and tons of salt. Even the best ribeye will taste underwhelming if not seasoned properly.”

What gives ribeye steaks such great marbling? They come from the rib primal of a cow, specifically, the longissimus dorsi, which gets very little use, hence the excess fat dispersed throughout the muscle. But in a grass-fed ribeye steak, that fat is a bit healthier than in a grain-fed or corn-fed ribeye.

The fattiness burns up when being cooked adding a juicy moisture to the meat, making it incredibly tender. Once you eat a grilled ribeye, you will definitely notice its smooth, rich texture and delicious beefy flavor. When cooked on an open flame, charred lightly and medium-rare in the middle 

According to Chef Yankel, “Ribeyes have a ton of fat so super high heat is the best way to get the most flavor.” When cooking on an open flame, char a ribeye lightly on each side — a few minutes on each side — and then let it sit for eight to ten minutes before cutting into.  Follow these instructions and you will get a perfect medium-rare steak every time. 

Here, for a little more detail, is Chef Yankel’s recipe for Garlic Crusted Ribeye Steak:

Garlic-Crusted Ribeye Steak

  1. Dry ribeye steaks and bring to room temperature.  

  2. Season steaks generously on both sides with salt and pepper.

  3. Preheat grill. If using an open flame, wait for flames to die down. Right before grilling, make sure grill surface is extremely hot, then rub it down with an oil-soaked rag – we advise using tongs to hold the rolled-up rag.

  4. Rub heads of garlic with olive oil, 1 tsp kosher salt, and 1 tsp fresh black pepper and wrap in aluminum foil.

  5. Bake garlic for about 30 minutes on the cooler side of grill – indirect heat.

  6. Once baked, peel the skin off garlic and place in food processor with ghee. Pulse to make a paste.

  7. For medium-rare, place ribeye steaks at 45° angle across hottest part of grill grates, then grill for 2 – 3 min per side, while rotating 90° every 1 ½ min.

  8. Place steaks on a baking sheet and smear 1 large Tbsp of garlic paste on top of each steak.

  9. Move steak to the cooler part of the grill, then grill for 4 min per side. Keep your meat moving to ensure that it cooks evenly. Remove from grill when a meat thermometer inserted into thickest part reads 120°F.

  10. Let the steaks rest for 8 min before slicing.

“hog-farmer”

london broil

London Broil: A dish that is most often grilled and has nothing to do with England

Beef dish names can be so odd.

London broil is just another example of the beef industry’s propensity for attaching names to cuts of meat that are confusing, don’t quite fit, or, sometimes, are quite unappetizing.

The Delmonico steak, for instance, was supposedly “invented” at Delmonico’s in New York; but the exact cut of beef that was used is often debated. Steak lovers aren’t sure whether a Delmonico is boneless ribeye steak, a bone-in top loin steak, or a boneless top loin strip steak. The Denver steak was “discovered” in the last decade, and its name comes more from the work of a marketing team than to any direct connection to the Mile-High City. And don’t get me started on the contrast between the tender and tasty flat iron steak and the old, hunk of metal used for straightening clothes from which its name is derived.

But London broil might be in a class of its own when it comes to its unique (and misleading) name. The cut — or cooking method to be more precise — has no connection to the capital of England, and, these days, it is rarely broiled.

A North-American treat

The most mind-blowing part about London broil is that it is completely unheard of in, of all places, London. The name may be a bit of the same trickery used with the Denver steak.

As far as most people can gather, London broil was first cooked in Philadelphia. The history behind the name is lost to time, but the best theory for its relation to the city of London is that the name was meant to add status — and an association to a British sensibility and European economic prestige.

London broil can be both a cut of beef and a way to prepare and cook a steak.

In the late twentieth century, it would be commonplace to go to the grocery store butcher and get a “London broil,” which would be one of the more inexpensive cuts. Likely, the steak consumers of that era were getting a flank steak — which didn’t have the same popularity as it does these days as a favorite for fajitas, steak sandwiches, and other such dishes.  The proper, regal sounding name may have been meant to appeal to consumers who might have perceived the affordable steak as a way to rise above their means.

The steak was likely brought home and cooked directly under the broiler in the oven until a crispy crust formed. Maybe some salt and pepper was a part of the cooking process. It was then sliced and served.

Many remember the dish as tough or flavorless. Those unfortunate food memories are likely due to the cooking practice of broiling on high heat as well as the lack of a critical step that is used to make London broil today: The marinade.

Many reflect fondly — and still enjoy to this day — a good London broil, we’ll share some best practices below to ensure you can delight in this delicious steak as well.

You just won’t ever find the steak in the city of London because it simply does not exist there; it is purely the product of the United States.

ClickHereForMore1

What exactly is London broil?

According to most accounts, those who remember getting London broil from the supermarket butcher recall it being a flank steak, or, sometimes, a thick piece of flank steak. (While it would make sense for skirt steak to be used as London broil due to its similarity to flank steak, there don’t seem to be many instances of that occurring.)

ButcherBox grass-fed “London broil” comes from one of the best cuts from the round primal of a cow; it is a great steak found in the rear leg section that doesn’t produce many good cuts of beef. According to ButcherBox Head Chef Yankel Polak, the 6-ounce cut that can be found in a monthly ButcherBox is “the most flavor of all the round steaks.”  

You may also discover that various beef cuts such as the top round, the bottom round, sirloin steak tip, chuck shoulder, or chuck steak is also labeled as “London broil.”

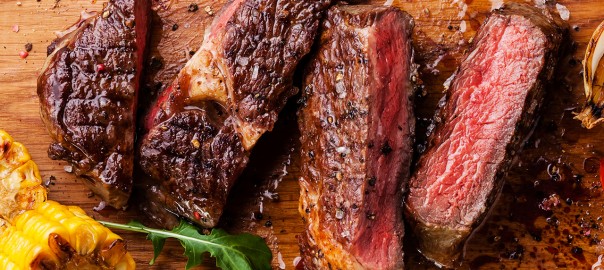
The main reason for this is that London broil is most often a cooking method that involves marinating a less tender cut, pan-broiling or grilling the steak and then slicing it — across the grain — into thin slices.

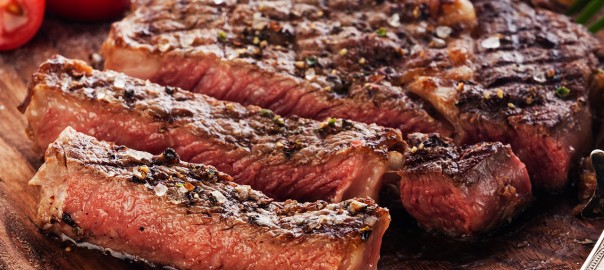
What many people love about London broil is its flavor. And while previous generations may have skipped a key step, it is the marinating of the beef that explains its popularity.

Whether a flank steak or round steak, when marinated right, it is a great dish. There is no best way to marinate a London broil, but combinations of soy sauce, garlic, olive oil, balsamic vinegar, mushroom sauce, red wine, rosemary, and other spices work best for the marinade.

The marinade can also be poured over the steak after cooking for added flavor. Chef Yankel thinks London broil is best served with a thick steak sauce or and easy-to-make au jus.

Don’t forget to CUT AGAINST THE GRAIN. If you don’t follow this essential step, you can quickly turn what would have been a tender steak into a tough cut — because you didn’t break the steak’s connective tissue — that is not easy to eat.

How to cook a London broil

As the name implies, a London broil is supposed to be oven-broiled in a shallow pan. Broiling has long been the traditional method of preparation.

However, these days, London broil is more likely to be grilled on an open flame over high heat than thrown into the oven. The reason? It may be that people feel they have more control over the doneness of their steaks when cooking on a grill.

The current popularity of grilling over an open flame rather than under a broiler may have to do with remembrances of eating a dried out, flavorless steak in the past. When cooked right, you can get a melt-in-your-mouth London broil cooked in the oven. It requires a diligent eye on cooking time and a great marinade.

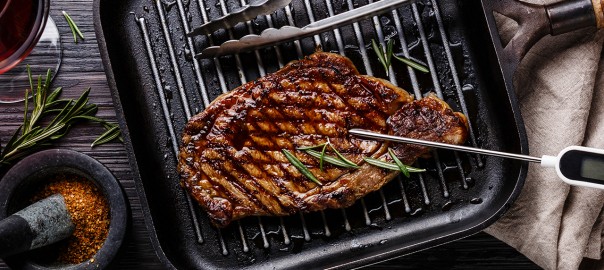
If cooking on a grill, Chef Yankel suggests preheating until the surface of the grill is extremely hot. Right before putting the steak that has already gone through the marinating process on the open flame, he suggests quickly rubbing an olive oil-soaked cloth over it.

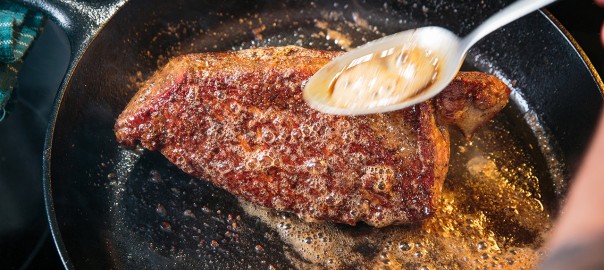
For a medium-rare London broil, Chef Yankel says to cook the room temperature steak on the hottest part of the grill for 3 minutes per side, rotating the steak on the grates 90 degrees each minute and a half. This process will give the steak a nice sear.  (You can also get a great sear by using Chef Yankel’s pan-frying method as well.)

Then put the steak on the cooler section of the grill and let it cook for four more minutes on each side. Use a meat thermometer to make sure that the thickest part of the steak reaches 120° F. Another key step is to make sure the steak rests for between six to ten minutes so that it cooks evenly and the flavorful juices are distributed throughout.

Again, make sure to cut against the grain when slicing. And enjoy!

If you are a ButcherBox member, Chef Yankel will be sharing one of his favorite London broil recipes in future boxes and on the member recipe page. If you aren’t already getting healthy grass-fed beef and other delicious thoughtfully-sourced meats delivered to your door each month, sign up here.


how long to cook steak in oven

How long to cook steak in the oven, and other tips for becoming a kitchen steak master

Craving a steak night dinner, but can’t fire up the grill? No problem.

Grilling is our preferred method to prepare a steak. Browse through the Cut Library within BB Kitchen, and you’ll notice grill written more than any other cooking method. But what if grilling isn’t an option?

While summertime grilling on the deck may be one of our favorite pastimes, sometimes it’s just not feasible. Perhaps you live in an apartment without access to a grill. Maybe you don’t even own a grill  — or the grill you do own is buried under three feet of snow.

While we’re partial to a perfectly grilled, medium-rare grass-fed steak with flawless sear marks, it’s not the only way you can prepare it. You can cook a juicy, flavorful steak right in your oven.

Selecting the right steak to cook

Cooking the perfect steak starts with selecting a quality cut. To purchase a good steak, consult with a farmer you trust, shop at a credible butcher or grocer, or order online to have your steak delivered right to your door.

Selecting high-quality steaks certainly has a number of health and ethical benefits, but you’ll also prefer the premium taste. Choose organic or grass-fed meat whenever possible. The organic label requires farmers raise their animals humanely and without growth hormones or antibiotics. Grass-fed meat ensures the animal grazed on grass during its lifetime, rather than feed made with corn or soy.

Pro tip: If you enjoy cooking steaks at home, consider purchasing an entire roast and slicing them into steaks yourself. A ribeye steak, for example, is nothing more than a ribeye roast cut into individual steaks. To save on cost without skimping on quality, consider purchasing an entire roast, slicing the steaks at home, then simply freeze what you cannot prepare in a single evening.

Which cut of steak works best in the oven?

Easy answer: All of them.

Any steak you enjoy on the grill can also be prepared in your oven. After all, does your favorite steakhouse come stocked with dozens of backyard grills? Of course not! They prepare premium, juicy steaks right from their kitchen. (Although some do have commercial indoor grills if they are lucky.)

You can make the same high-quality meat at home — you just need the right tools and a few tricks up your sleeve.

To prepare a steak in the oven, we recommend keeping the following on hand: A meat thermometer, aluminum foil, and a cast iron skillet. With those three items stocked in your kitchen, you should have all you need to follow any steak recipe you find online. Sprinkle a bit of sea salt and freshly ground black pepper, and you have yourself a steakhouse-worthy meal.

When cooking a steak in the oven, remember the following:

  • A medium-rare steak typically reaches an internal temperature of 125°F. Remember, a steak will continue to cook even after you take it out of the oven, so it’s best to remove it from the heat source when it reaches 115°F.
  • Do not try to rapid-defrost your steak. If you’re planning a steak night dinner for two, plan ahead and allow your steak to defrost slowly (beginning night before), bringing the steak to room temperature.
  • Do not serve your steak immediately after removing it from the oven. Allow your steak to sit for six to ten minutes or more before serving so as not to lose its flavor.

How long to cook steak in the oven?

When preparing a steak in the oven, the cooking time depends on several factors: The cut, the thickness of the cut, and the cooking method used within the recipe. Below, we dive into three different ways to cook your steak at home, including broiling, searing at high-heat in a cast iron skillet then finishing in the oven, and the reverse-sear method — a favorite of our Head ButcherBox Chef Yankel Polak.

One final tip: Don’t take your eyes off of your dinner. Cooking a steak in the oven is no different than preparing a grilled steak over an open flame. It can easily become overcooked, so keep one eye on the timer and the other on your instant-read thermometer.

The reverse-sear method: How to prepare a ribeye

One of our members’ favorite steaks is the ribeye, which is a great cut to prepare in the oven. It’s juicy, flavorful, and pairs great roasted vegetables.

Lisa MarcAurele from Low Carb Yum uses the reverse-sear method to prepare her steak. First, she places her steak in the middle of the oven rack, preheated 275°F. After cooking it for 40-50 minutes, it reaches the desired medium-rare temperature. After allowing the steak to sit for 5-10 minutes, she sears it in a piping-hot pan drizzled with olive oil. To see Lisa’s full instructions and how she seasons her steak, check out the full recipe.  

Searing a steak in cast iron: Preparing a sirloin steak

We love top sirloin for how versatile it is. This particular cut has the texture of steak but has a similar taste to that of a roast — allowing it to cook up nicely in the oven.

Linda Spiker at The Organic Kitchen prepares her sirloin steak by searing it first in a cast iron skillet (the opposite approach Low Carb Yum took with her ribeye). Once the steak browns on the stovetop, she moves the sirloin from the cast iron to an oven-safe baking dish.

A pan-seared steak only needs an additional five minutes in the oven to reach the perfect temperature. Plus, cooking steak this way allows you to reuse the cast iron skillet, browning any sauces or side dishes in the steak juices. Using this method, she pairs her steak with caramelized shallots and a white wine reduction, which you can check out here.

Broiling in the oven: Cooking a New York strip

Love a thick-cut New York Strip? The team at PaleoHacks broils their New York strip with a side of asparagus, creating an easy steak night dinner for two.

Broiling is one of the easiest methods to prepare a steak. Set your broiler to high, place your steak in an oven-safe dish in the center of the rack six inches from the heat source. Ten minutes under the broiler is all you need to achieve a medium-rare temperature. To read the full instructions, check out their recipe here.

While we focused on the ribeye, sirloin, and New York strip, any of the above methods are suitable for almost any cut of steak. If you’re craving filet mignon or a thick-cut T-bone, any of the above methods will work.

There are plenty of advantages to preparing a steak in the oven. The temperature is easily controlled, it’s not weather-dependent, and you don’t need any special equipment. Try one (or all) of the above recipes and let us know your favorite cooking method.

braised beef braising meat

How to braise beef and why it’s one of the best cooking methods

Whenever I come across braised short ribs on a restaurant menu, I have a hard time passing up the delectable dish. Just thinking about it, I can taste the melt-in-your-mouth, flavorful meat. In all my short rib adventures, I’ve never stopped to wonder how chefs create such divine creations.

The secret, I discovered comes down to braising.

A cooking method mixing high dry heat, low moist heat, and time

Braising is a two-step cooking method that uses both high-heat for a short period and low-heat for a longer period of time. First, it involves browning meat in olive oil, butter, ghee, or some other fat — on high heat — usually by sauteing in a pan. Second, the meat is cooked in a covered dish, in the juices left from the browning and often also with an added liquid such as stock, water, etc.

The second, slow-cooking step is done in a tightly covered pot, like a dutch oven, or, often, in a slow-cooker. This process is also sometimes referred to as “pot roasting.”

Slow-cooking — and, well, the use of a slow-cooker or Crock Pot — helps to add flavor and tenderizes tougher cuts of beef and other meats.

According to The Kitchen Encyclopedia, published in 1911, “Braising is a method much used in France, and is a cross between boiling and baking.” The word itself derives from the French word brasier, which is a form of braise, meaning “live coals.” A brasier or brazier, in French and English, is also another name for a receptacle to burn coal or charcoal. Dutch ovens can also be called brasiers. The origin of the term braising seems to come from a French word for a method using both dry heat and moist heat.

Why braise?

Braising can be done with any meat but is most often done with tough cuts of meat, because tender cuts usually don’t need additional tenderizing or flavor.

Cuts that traditionally have less flavor — say a chuck roast, shoulder steak, chuck pot roast, pork butt, or beef chuck arm — are the best cuts to use and may need richer braising liquids. The best way to add great flavor is with beef broth or chicken stock, as well as spices like rosemary, bay leaves, and other fresh herbs. Moreover, braising done in the style of a pot roast can include aromatic vegetables — carrots, onions, and more — for additional flavor.

How to braise meat

The first step of braising takes about ten minutes, but achieving truly fall-apart-tender meat takes many hours of cooking time. Our in-house ButcherBox Chef Yankel Polak recommends seasoning the meat with salt and black pepper, then searing your meat until you get a nice brown crust. When cooking pork, he likes to use apple cider as a braising liquid that can also help scraping the browned bits of meat left from searing. Chef Yankel also recommends adding tomato paste to your braising liquid for texture and taste. For added flavor and simplicity, he also advises using the same pot to sear and cook, covering the dish after the flavorful liquid and browned meat have simmered.

A long, slow cook is crucial for breaking down the proteins and tenderizing the meat. You’ll need to cook for at least an hour and a half to two hours (depending on the size of your cut of meat) in the oven set to 300 degrees. Cooking on low heat allows the meat to cook slowly as the braising liquid evaporates. It is this process that makes dishes like pulled pork, carnitas, and roasts fork-tender.

Whether cooking pork in the slow cooker or keeping a watchful eye on a roast spending a day in a Dutch oven, meat braising in its juices and spiced-up flavor can turn a simple cut of beef or pork into a truly amazing dish.

You can find some of Chef Yankel’s favorite recipes to braise beef, chicken, or pork here, or watch the video below for more braising techniques.

If you want more from Chef Yankel, check out his recommendations for the best red wine to pair with braised beef and other dishes. 

Our monthly ButcherBox comes often comes with cuts like pork butt and grass-fed beef roasts that are perfect for braising. You can also get these cuts in a custom ButcherBox. If you’re not a member already, you can sign up here.