Tag Archives: cook time

smoking-meat

The ultimate guide to smoking meat at home

Smoking meat is a prehistoric culinary art. In the past, the technique was used to preserve protein-rich foods. Smoking dehydrates meat and imparts antibacterial properties that keep it from spoiling quickly. While our ancestors used the method to preserve red meat and fish, today smoking is used for all kinds of meat — not just as a preservation method — and the enhanced flavor makes it quite the delicacy.

We’re most familiar with smoked meats in the form of barbecue: When meat is treated to the low and slow treatment in a smoker, connective tissues and collagen within the meat break down,  resulting in ultra-flavorful, ultra-tender food. Top that off with the bevy of barbecue sauces we’ve invented — vinegar-based, sweet, thick and tangy, you name it — and you’re in heaven.

This guide delves into the ins and outs of smoking meat at home — from equipment to wood chips to the best cuts of meat to smoke.

Equipment

There are several fancy smoker options, from pellet smokers to vertical electric smokers to offset smokers for the true meat smoking aficionado. These smokers are specially designed for applying indirect heat at steady low temperatures, and most cost several hundreds of dollars.  While cooking with a Traeger wood pellet grill can be amazing, if you’re a novice who’s not ready to invest too heavily into smoking equipment, have no fear.

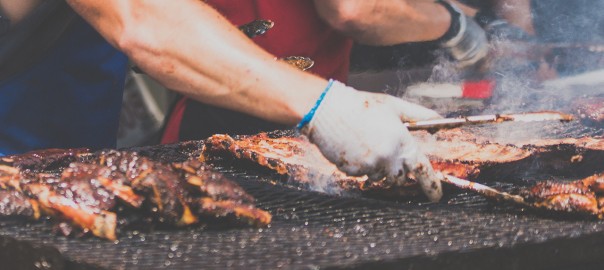
Everyday gas grills and charcoal grills can be manipulated to smoke meat with just a little effort.

Gas grills can be tricky to use as smokers, as they’re designed to cook meat over direct heat at high temperatures — the opposite of smoking, which is low, indirect heat over a long period of time.

With a little patience, however, a gas grill will smoke your meat. You’ll need to build an indirect heat zone and a direct heat zone within your grill, making sure to keep your meat in the indirect zone. Experiment with your burners until you’re able to bring the internal temperature to around 250°F which you can check with a meat thermometer (for most cuts of meat, anyway).

You’ll need a smoke box to hold your — soaked and drained — wood chips. Newer gas grills sometimes come with a built-in metal smoker box, but you can also purchase a heavy duty metal smoker box or make an inexpensive one at home by placing the wood chips in a foil pan, covering it with heavy-duty aluminum foil, and adding slits with a knife. 

It’s a good idea to set up a drip pan to collect the drippings of your meat. Also, be sure to add a small amount of liquid to the drip pan — like water, apple juice, or beer — to add moisture and keep the drippings from drying out. Don’t set the pan directly on top of the burners, but rather on a grate, with another grate above for the meat. 

As for a kettle or charcoal grill, like a traditional Weber, things are a little simpler. Remove the cooking grate from your grill and place the drip pan on one side. Remember to fill it with some liquid. Next, pile up your coals or lump charcoal on the opposite side of the grill. 

Once the coals are white hot, you can add your wood and then smoke your meat over the drip pan. While you’ll occasionally need to open the grill to add more coal or wood, try not to disturb the smoking process.

Cuts of Meat

In truth, you can smoke pretty much any kind of meat or seafood. Poultry, red meat, pork, fish are all fair game — game meat, like venison, is also great when smoked.

But, if you’re looking for meats that respond really well to the smoker, you’ll actually want to aim low, rather than high. Low-cost, tougher cuts of meat tenderize when smoked low and slow.

For example, try Boston butt — or simply pork butt as it’s also simply called — for sumptuous pulled pork. Be sure to rub your pork butt amply with your desired spices — we like this smoky coffee rub recipe. Other pork options include ribs, like this brown sugar rub and mustard barbeque sauce-laced recipe. You can also smoke sausages for a complex, savory flavor.

While you can smoke leaner cuts like pork loin, it’s not ideal, as it responds better to grilling or roasting than smoking. 

Beef brisket is the king of smoked meat, and the perfect cut when it comes to smoked beef. Give this smoked brisket with citrus marinade a whirl. But one thing to remember is not to smoke steaks—seriously, a simple grill or hot skillet is a better bet.

Poultry like whole chickens and turkeys turn out great in the smoker. You can also smoke chicken leg quarters if you’re not feeling up to the whole chicken yet. Here are some pecan smoked chicken wings for a super simple smoked recipe.

Wood Chips and Chunks

Not all wood is created equal when it comes to smoking meat. For one, you should never use any old wood you chopped down in your backyard — it’s potentially toxic. Never fear, though, there are plenty of other woods to experiment with as you smoke meat

While wood chips are sold more readily in most grocery stores and hardware stores, they tend to ignite quickly and burn out quite fast. This is not ideal for smoking low and slow. Wood chunks, on the other hand, burn for hours in a smoker. They do take a bit longer to ignite, but if you’re smoking meat, you’ve probably already committed the time.

If you use wood chips, be sure to soak them for at least 30 minutes before using. This will ensure they burn long enough to impart some flavor to the food.

What about the many varieties of wood? Getting the smoky flavor you want requires choosing the right wood.

Consider them on a scale of mild to intense. Fruity woods, like apple, peach, cherry, and pear, are light and sweet. They pair well with poultry, fish, and pork. Hickory, maple, pecan, and oak are stronger, but not overwhelming. Beef, game, and pork all go well with these woods. Mesquite is the most intense wood—it’s best used in moderation and with red meat.

Once you’ve mastered smoking with one wood, feel free to experiment with mixing woods for different flavors. 

Now, you’re equipped with everything you need to know to get started on smoking meat. Get cooking!

chicken and waffles

Chicken and waffles: A history and our easy recipe

Don’t miss our ButcherBox recipe for “Buttermilk Fried Chicken and Gluten Free Waffles (Organic Free Range Chicken)” at the bottom of the page.

Many of our favorite modern dishes are the product of culinary cultures colliding.

“Pizza Margherita,” a flatbread that featured tomatoes and cheese, is believed first to have been served in Naples, Italy in the 18th century — only after the introduction of tomatoes from America. Cheeseburgers are the result of German-American immigrants taking a traditional “Hamburg steak” and placing it on bread for convenience. Spaghetti noodles’ arrival in Italy by way of China, Korean tacos with kimchi and bulgogi…the combinations are endless.

Which brings us to the fantastic delight that is “Chicken and Waffles.”

Fried chicken — boneless or not — piled on top of a fluffy waffle with some melted butter and maple syrup is as American as it comes.

First, having bacon, sausage, and ham — or Canadian bacon — isn’t enough for us, so we had to come up with a new way to jam some more meat into our breakfast. Innovation!

Second, even though a breakfast food, we’ve found a way to incorporate chicken and waffles beyond the diner. It has evolved into something with a bit more cache than your standard quiche or breakfast burrito. For instance, chicken and waffles is a regular pass around dish at many cocktail events these days. At places like the Lower East Side’s Root & Bone and Brooklyn’s Sweet Chicks in New York, the dish can be found on dinner menus for between $17 and $25. Boston’s well-known Myers + Chang features their own take on chicken and “ginger” waffles, which is one of the hotspot’s more popular dishes.

History of “Chicken and Waffles”

Before digging into the background of this delectable combo, first we need to trace the origins of waffles and fried chicken in the U.S.

According to lore, waffles in America can be traced back to the arrival of the Pilgrims in Plymouth. As the story goes, the Pilgrims were introduced to the dish while exiled in Holland before heading to the New World. Waffles became more prominent after the Dutch populated what is now New York, bringing with them “wafles.” However, the figure credited with the widespread popularity and acceptance of the breakfast treat in America is none other than founding father Thomas Jefferson, who is believed to have brought one of the first waffle irons to the U.S. after discovering the apparatus in France.

The story of fried chicken’s birth in the U.S. is more complicated and entwined with the history of slavery in the South. A recent Atlantic feature, “As American as Fried Chicken,” does better than I could at digging into the complex background of the dish and its place in soul food traditions.

How Southern soul food and Dutch/Belgian culinary traditions came to be conjoined in one delicious dish is not necessarily agreed upon by food historians. Some point to the popularity of something known as Dutch “waffle frolics” in the South, at which African-Americans fused many of their cultural cooking traditions — including spiced chicken — with waffles or pancake-like crepes. Others believe that jazz-age Harlem was the birthplace of chicken and waffles as we know the dish today.

There is also another completely separate tradition of Pennsylvania Dutch chicken and waffles that uses a pulled or stewed chicken dinner as opposed to fried chicken piled on top of waffles with gravy.

While the origins are disputed, the popularity of the dish is undeniable.

How to cook “Chicken and Waffles”

These days, you can find many different takes on chicken and waffles. In Nashville, the dish is combined with the city’s signature “hot chicken,” and versions of chicken and waffles with Buffalo chicken can be found at gastro pubs and restaurants in almost every city in America. Chicken and waffles with chocolate, gravy, variants of maple syrup, hot sauce, and more are widely available, and recipes abound for the dish. You can use a whole chicken, chicken tenders, or chicken breast, and can prepare it southern chicken-style or how ever you wish. Just make sure your chicken is golden brown and that you follow a fluffy, crispy waffle recipe.

Our in-house ButcherBox chef Yankel Polak has his own take on the dish. His “Gluten-Free Chix ‘n Waffles” recipe is one of the most popular among our ButcherBox recipes. You can check Chef Yankel out in the video below and find the recipe at the bottom of this page.

Chef Yankel suggests pairing this delicious, healthy dish with “a smoky maple syrup for the ultimate flavor bomb.” And make sure to have your waffle iron and a Dutch oven or a deep skillet handy!

Chef Yankel’s Buttermilk Fried Chicken and Gluten Free Waffles (Organic Free Range Chicken)”

Prep time is about 30 minutes and cook time 40 minutes. This recipe serves six.

Ingredients:

  • 1 ButcherBox Whole Chicken, cut into 10 pieces

Marinade

  • 3 cups buttermilk
  • 1 tsp dry thyme
  • 1 tsp dry sage
  • 1 tsp garlic powder
  • 1 tsp onion powder
  • 1 tsp paprika
  • 1 tsp black pepper
  • ½ tsp cayenne pepper
  • 1 Tbsp kosher salt

Coating

  • 2 c almond flour
  • 6 eggs, beaten
  • 3 c gluten-free 1-1 flour
  • 2 Tbsp kosher salt
  • 1 Tbsp black pepper
  • ½ tsp cayenne pepper
  • 1 c coconut oil, for frying
  • 1 c ghee, for frying

Waffles

  • 2 eggs
  • 2 c gluten-free 1-1 flour
  • 1 ¾ c milk
  • 4 tsp baking powder
  • 2 tsp kosher salt
  • ½ c coconut oil
  • ¼ c chives, chopped
  • 1 Tbsp maple syrup
  • 1 vanilla bean, just seeds

Directions:

Marinade

  1. Place chicken pieces in a large or medium bowl with buttermilk and all marinade ingredients. Mix well, cover and refrigerate for 8 – 24 hrs.

Fried Chicken

  1. Place 1 c ghee and 1 c coconut oil into Dutch oven. Place on medium flame and preheat oil to 350°F.
  2. Place almond flour, egg and 1-1 flour in 3 separate dishes.
  3. Remove chicken from buttermilk mix and place on wire rack to drain.
  4. Gently coat each piece of chicken, first in almond flour, then egg, then 1-1 flour and set on pan.
  5. Preheat oven to 350°F.
  6. Place 4 pieces of chicken in fat and fry for 2-3 min on each side or until lightly golden brown. Move to baking sheet. Repeat for remaining chicken.
  7. Place chicken in the oven and continue to cook until thermometer inserted into thickest part registers 165°F, about 20 min.

Waffles

  1. Crack eggs in medium to small bowl and whisk until frothy, about 3 min.
  2. Add remaining waffle ingredients and whisk gently until just mixed. Don’t overmix the batter – it should be chunky!
  3. Grease waffle iron and cook waffles as directed or until golden-brown.
  4. Serve with your favorite maple syrup and a little sriracha or other hot sauce!  


ClickHereForMore1