Tag Archives: Chef Yankel

Baby back ribs – A smoky, sticky summer treat that you can enjoy anytime

Baby back ribs are a staple of true barbecue masters’ arsenal — from St. Louis to Memphis, South Carolina to the heart of Texas.

And whether slow cooked for a few hours in a Crock Pot or an entire day in a smoker, baby back ribs are delectable no matter how they are prepared.

The cut comes from the top of a pig’s rib cage, specifically the area just below the loin between the spine and what we know of as the spare ribs. Baby back ribs are distinguishable by their tapered shape and the greater amount of meat — compared to spare ribs — often found on top of and between the rib bones. Usually, a rack of baby back ribs includes between eight to 13 ribs that vary in length from three inches to about six inches.

While any reputable smokehouse or barbecue shop will have baby back ribs, how to cook them — more specifically, how to flavor them — is a source of disagreement among the major barbecue regions of America: Carolina, Texas, Memphis, and Kansas City styles. Although we don’t have to break down which version of BBQ is best at this moment, there is something perfect with having a little sweet and savory flavor added to baby back ribs. 

baby-back-ribs

Baby back ribs are also one of the cuts of heritage-breed pork that ButcherBox Head Chef Yankel Polak loves to experiment with when he cooks.

“Every time I cook baby back ribs, I learn something new,” Chef Yankel says. “They are super flavorful and have just the right amount of fat.”

“And of course anything with a bone attached is just that much better.”

There are many ways to cook baby back ribs. You can check out a few in our recipe pages.

But Chef Yankel has a very specific method to get his ribs just right: “I give them one hour of smoke at 225°F, then two hours in the oven at 250°F, wrapped tightly in foil, bone side down and with a splash of vinegar.”

“To finish,” Chef Yankel explains, “I give them 30 minutes on the grill with about 10 applications of a sweet and sticky BBQ sauce.”

You can check out Chef Yankel preparing his “Oven-Baked Baby Back Ribs with Chipotle Pineapple BBQ Sauce” in this video or use the “Sweet and Sour Slow Cooker Ribs” recipe below if you don’t have a smoker but want to slow cook your baby back ribs.

Sweet and Sour Slow Cooker Ribs

Ingredients:

  •  1 pack ButcherBox Baby Back Ribs

The Rub:

  • 1 Tbsp onion powder
  • 1 Tbsp garlic powder
  • 1 Tbsp smoked paprika
  • 1 Tbsp ginger powder
  • 1 Tbsp dry mustard powder
  • 2 Tbsp brown sugar
  • ½ tsp cayenne
  • 1  tsp black pepper
  • 2 Tbsp kosher salt

The Liquid

  • ¼ c maple syrup
  • ¼ c coconut amino
  • ¼ c sherry vinegar
  • 2 Tbsp liquid smoke

Directions:

      1. Pat dry ribs with a paper towel and peel off membrane on the bone side of ribs. You can also score the membrane with a sharp paring knife in an ‘X’ formation.
      2. Mix all rub ingredients and massage into ribs.
      3. Place all liquid ingredients in slow-cooker, then add ribs. Cook on low setting for 4 hrs.
      4. Let rest in liquid 20 minutes before serving.
      5. For a super quick sauce, remove ribs from slow-cooker, then place all liquid in saucepan, and simmer until thickened.
      6. Pour over ribs and broil for extra crispy texture and real BBQ flavor!


grill tacos

Turn off your oven and grill tacos this summer

Tacos.

You can never go wrong with tacos. And while in a former life I wouldn’t blink at “Making a Run for the Border” for a few late night beef, cheese, and lettuce treats. These days, there are too many good things happening with tacos to out there to even think about heading to the Taco Bell.

Not only are there a lot of Mexican restaurants concocting tacos with fantastic flavor combinations or perfecting the classic Mexican street taco, but there are also a plethora of amazingly delicious taco recipes out there these days that are quick, easy, and affordable. 

For a truly splendid taco experience, you need to make them yourself. Skip the stovetop, skillet, and box of hard tortilla shells and seasoning mix, and throw lightly seasoned grass-fed flank steak on the grill, and thank us later.

There is no better time than summer to fire up the grill and make your carne asada tacos or grilled chicken tacos.

We even fully support cranking up the slow cooker for some al pastor or carnitas with a heritage breed pork butt. But, you don’t even need to do that. You can make both pork taco dishes on your grill as well. 

Before we get into some great tactics for making the best grill tacos this summer, let’s quickly dig into how the delicious food became so popular in the first place.

Silver mines to street tacos to Tex-Mex

According to Jeffrey M. Pilcher, professor of history at the University of Minnesota and the author of the book Planet Taco: A Global History of Mexican Foodtacos as we know them today can be traced to the snacking habits of Mexican silver miners.

Pilcher explains in his book that, “People have been eating corn tortillas with bits of meat or beans rolled up inside for more than a millennium.” These corn-dough snack foods were known as antojitos and would come in many shapes with a variety of fillings.

The Spanish word taco was used for a “small bite of food” well before it can be found used in Mexico, according to Taco Planet. The term was also used for firearm plugs, among other things. At one point, “taco” was slang for gunpowder wrapped in paper used by silver miners outside of the town of Pachuca. It happened that these Mexican miners also preferred rolled tacos — and used that same term for both explosives and their packable lunches. Once the silver mining operations died down, they brought their rolled version of the dish to the streets of Mexico City, and then later to the American Southwest.

Tacos emerged in the American Southwest in the mid-twentieth century due to cultural intermingling and one particular food entrepreneur. 

Mexican Americans living in the “borderlands” created various versions of tacos influenced by the mixing of cultures along the US-Mexico line. Tex-Mex, New Mexican, and Cal-Mex cuisines all had their own versions of the taco. Rolled tacos, for instance, are still popular at authentic Mexican restaurants in Southern California today.

While at a rolled taco shop in California in the 1960’s when hot dog vendor Glenn Bell realized he could quicken the pace of the methods used to make the long-cooking, fried rolled tacos. He realized he could do for the taco what McDonald’s did for the cheeseburger and opened his first taco shop in San Bernadino. Taking a relatively little-used preparation technique — the pre-fried, U-shaped, crispy corn tortilla shells — Bell’s restaurant, which eventually became Taco Bell,  turned a Mexican food tradition into an American staple.

But the best tacos are grill tacos

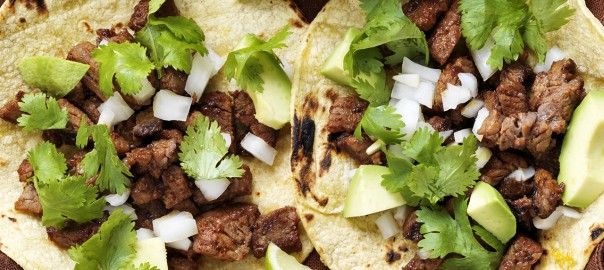
There’s a bit of a food culture backlash against Glenn Bell’s crispy creation among taco aficionados. The days, the standard Mexican street taco — or at least a version of it with soft corn tortillas, barbacoa or carnitas, and a garnish of onions and cilantro — has become more prevalent at authentic Mexican restaurants, hole-in-the-wall Mom-and-Pop joints, street vendors, food trucks, and the like. 

In his book on tacos, Jeffrey Pilcher even made a trek to Hermosillo, Mexico, to try the regions hard-to-find, traditional taco specialty, carne asada tacos. To make a point about “fast food,” he recounts the two minutes it took the husband and wife street cart vendors to grill their steak to perfection and fill it in warm tortillas with onions and cilantro. On his return to America, he compares his experience in Hermosillo with the two minutes it took the staff at a Los Angeles Taco Bell to nuke their take on the steak taco. 

The best part of the move away from pre-mixed taco seasoning and ground beef tacos is that people now realize, just as Pilcher did, that it is as easy to make grill tacos in the far more delicious and fresh manner by cooking a lightly-seasoned steak on a grill or slow-cooking pork tacos.

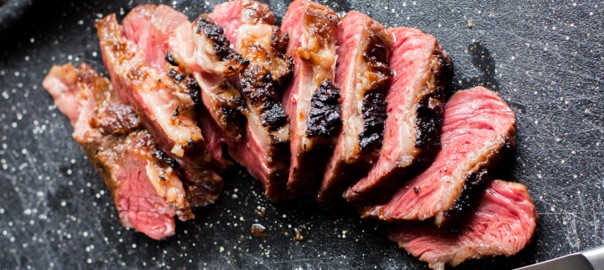
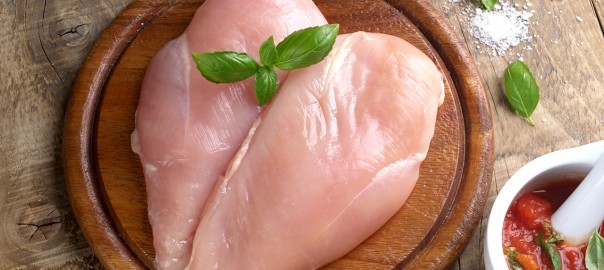
We love all kinds of tacos, and we don’t think anyone can beat tacos with grilled grass-fed steaks, like flank steak or skirt steak, as well as free-range organic chicken breasts and heritage breed pork butt. 

There is no comparison to marinating a steak overnight in some sweet and spicy marinade and throwing it on the grill, and then cutting it up, throwing it in some warm corn tortillas, and then adding some fresh radish or cabbage or cilantro. This dish is obviously best with some refried beans and an ice-cold Modelo. 

We even found a recipe created by our friends at Traeger Grills that allows you to make al pastor tacos right on the grill. 

But for all the recipes we love, few compare to Head ButcherBox Chef Yankel Polak’s delicious and easy NY strip steak tacos — grilled to perfection, sliced, and then mixed with a cabbage slaw. 

Check it out one of the best taco recipes we’ve tried below: 

Sweet and Sour NY Strip Tacos with Cabbage Slaw

Prep time: 15 minutes

Cook time: 15 minutes

Ingredients:

  • 2 ButcherBox NY Strip Steaks
  • Marinade and Slaw Dressing
  • ¼ c sesame oil
  • ¼ c honey
  • ¼ c coconut aminos
  • ¼ c rice vinegar
  • 4 Tbsp sesame seeds
  • Slaw
  • 2 c shredded napa cabbage
  • ½ c shredded carrots
  • ½ c shredded Gala apple (any apple works!)
  • salt and black pepper to taste
  • 2 Tbsp fresh chopped cilantro (optional, for garnish)

Directions

1. Mix all marinade ingredients. Use ½ to marinate the steaks overnight, and reserve other ½ for the slaw.

2. Mix cabbage, apples, and carrots. Dress with marinade and refrigerate overnight for best flavor.

3. Preheat grill. If using an open flame, wait for flames to die down. Right before grilling, make sure grill surface is extremely hot, then rub it down with an oil-soaked rag – we advise using tongs to hold the rolled-up rag. 

4. For medium-rare, place NY Strip Steak at 45° angle across hottest part of grill grates, then grill for 2 – 3 min per side, while rotating 90° every 1 ½ min. Move steak to the cooler part of the grill, then grill for 4 min per side. Keep your meat moving to ensure that it cooks evenly. Remove from grill when a meat thermometer inserted into thickest part reads 120°F.

5. Rest for at least 8 min. Slice thinly against the grain.

6. Serve steak topped with slaw in your favorite taco shell or sticky bun. Garnish with fresh cilantro and enjoy!

Cooking music: The key ingredient in our kitchens

Anyone who considers themselves a cook — whether that be a master chef, a harried mom making dinner for a family of six, or a fan of every cooking show on the planet — has more than a few kitchen idiosyncrasies. It may be a favorite knife, a certain cutting board that has been passed down through generations of family cooks, or a habit of finding a specific place to keep herbs and spices.

One of the more common kitchen traditions — discovered through a highly-scientific process of asking chefs we know and discussing our own experiences — is the practice of needing to cook to a specific and favorite type of music.

Some of the world’s top chefs have been known to be very territorial about not only the genre of music to get the kitchen rocking out to while cooking, but the acceptable artists, volume, and such. 

One famous bit of lore has it that the late Anthony Bourdain viewed playing the wrong type of music sacrilege when he ran his own kitchen. According to an old Entertainment Weekly story, Bourdain number one rule was, ”If you play Elton John, Billy Joel, or the Grateful Dead, you will be fired!”

Bourdain, who grew up in New York during the early days of punk rock spoke about cooking and music a lot on his shows Parts Unknown and No Reservations. If you want a great dive into Bourdain’s punk roots, check out this great podcast he did with Damian Abraham for “Turned Out A Punk.”

“cooking-music”

But experiences vary. For some, the type of food one is cooking can dictate the kind of music to play. Jazz music? Louis Armstrong is a favorite for prep work or dinner. Italian music? Motown? Old-school hip-hop? Maybe they’re all a bit cliche, but that doesn’t mean that cooks across the country — professional or not — don’t still crank up their Spotify “Italian Cooking Music” playlist when preparing a bolognese.

We recently asked some of our customers about their kitchen habits, including their favorite cooking music. The responses were wide-ranging: ButcherBox subscribers like to listen to every type of music imaginable — from country to EDM, folk to pop, Christian to death metal, and artists ranging from Springsteen, the Beatles, and Van Morrison to Jack Johnson, Neil Young, The Rolling Stone, Adele and Frank Sinatra.

Our Head ButcherBox Chef, Yankel Polak, has his own rituals for cooking at home and for running a kitchen.

When doing food preparation and cooking at home, the mood or the food might dictate what he plays. For example, Chef Yakel has some strong opinions of what should be played at a Sunday brunch. According to Chef Yankel, Sunday is always a Blues day; so, while making brunch, he might play some Buddy Guy or Stevie or Tab Benoit —  powerful, great music with a positive vibe. “For me, that’s the music that says, ‘Hey, I’ve got all the time in the world, and I’m gonna cook the hell out of this Hollandaise while still in my pajamas,’” says Chef Yankel.

“Event preparation is a totally different animal,” he said. “If it’s an all-day cooking marathon, uplifting electronic is probably the ticket. Something with a driving beat but in the background, so it’s not distracting.”

“You don’t want to miss a detail!” he added.

Weeknight dinners are a bit different according to Chef Yankel. “Those will probably involve something instrumental — classical or jazz music — something to help wind things down from the day. “

But when he ran a kitchen, it was quite a different approach. For Chef Yankel, music served as a way to pump up and speed up the staff as they prepped and anticipated the start of each night’s dinner service.

For example, Chef Yankel said that he used to blast heavy metal or dubstep to get the crew riled up. There was nothing gentle or mellow. “We basically turned the kitchen into a two-minute mosh-pit before a crazy night of service,” he said.

“If you weren’t hyperventilating from sheer panic at the amount of business we were about to do, you weren’t going to move fast enough to get through it. The music reflected that.”

Once service began, the volume got turned down. “The chef’s voice was all the music you needed,” Chef Yankel said.

“But when that last order left the kitchen, the volume got cranked back up to maximum for that second wind needed to clean properly.” In Chef Yankel’s kitchen, that usually entailed the blasting of some Old-School hip-hop or bachata, music to get the crew dancing as they cleaned. Otherwise, as he said, “The end of the night could be a real drag.”

So whether it serves to inspire a passion for cooking, matches the vibe of a meal, or is necessary to pump up a restaurant staff, music is an integral part of most kitchens.

There really is nothing like moving around the kitchen to some great music or standing by a grill rocking out to your favorite Spotify playlist. 

We’d love to hear about your own music-inspired traditions too, so please share in the comments section below.

“cooking-music”

steak marinade

Make a great chicken, pork, or grass-fed steak marinade for a mouthwatering meal

Quality chicken, pork, and beef can often be thrown directly on the grill without any seasoning — or with just a pinch of kosher salt and freshly-ground black pepper — and taste amazing. But, an excellent homemade steak marinade — for instance — can take your meat to the next level.

Many steaks can be immensely improved with a little kitchen creativity and some minced garlic or soy sauce. This is especially true of skirt steak, flank steak, and similar tougher cuts with lots of connective tissues.

But if you really want to pack flavor into a grass-fed, grass-finished steak or some pasture-raised, heritage-breed pork or free-range chicken, a little knowledge of how marinades work and which flavor combinations are best can make a standard weeknight meal into a savory, memorable culinary experience.

Is it necessary to marinate steak, pork, or chicken?

Why marinate, you ask? Marinating before grilling is an excellent way to add additional flavors and to get more tender meat.

Marinades work well because of the natural attributes of beef, chicken, and pork, according to Head ButcherBox Chef Yankel Polak. “The longer you leave a protein in a marinade the more flavor it should absorb,” he explains, “and, what’s more, marinating will tenderize a tougher cut of meat.”

The problem is that, in reality, most marinades only penetrate about 2 millimeters deep. “And, get this,” Chef Yankel says, “it all happens in the first few seconds.”

So, while many people think that marinating meat for extended periods of time, or even overnight, is the key to having meat with fantastic flavor, that’s not actually the case. “While there is nothing wrong with preparing your ingredients the day before, remember that a good marinade only needs minimal contact with your protein to do everything it’s supposed to do,” according to Chef Yankel.

A good marinade enhances flavors

While there are many options for chicken or steak marinades, you can pull right off the shelf of your grocery store to have a pretty good meal, making your own marinades is healthier and leads to more flavorful pork chops or a nice juicy steak.

If you can, try to keep the marinades as natural as possible. It would be foolish to take a nice cut of grass-fed steak or heritage-breed pork and then douse it with some combination of corn syrup and lab-made additives.

Keep in mind that different cuts and types of meat have different flavor profiles. Some flavors will work best with, say, a flank steak more so than a ribeye, and vice versa.

“Think about the item you are cooking, whether that’s chicken, beef, or pork, and use ingredients in your marinade that will complement the flavor,” Chef Yankel says.

Flavor profiles for each type of meat

According to our chef, the best complementary flavor profiles are citrus for chicken, sweet flavors for pork, and marinades that are rich and savory for beef, especially grilled steaks.

This is why lime and lemon juices go great with other spices in chicken marinades; pineapple, brown sugar, and maple are great to have in pork marinades; and balsamic vinegar, minced garlic, and mushroom flavors work well as steak marinades.

“While they don’t alter the internal structure of the meat,” Chef Yankel adds, “acidic elements in marinades will certainly give you that extra punch of flavor — the ‘wow’ factor that accompanies that first bite.”

Some flavors that can’t be made from scratch — unless you have time to ferment malt vinegar, molasses, anchovies, and tamarind extract for 18 months. So it is okay to mix some natural ingredients like rosemary or fresh lemon juice with a good soy sauce or Worcestershire sauce.

Using a homemade marinade on your grass-fed steak can change a mundane meal into something otherworldly. Experiment and you might discover unexpected flavor combinations that work wonders for your palate.

And, to save you some precious time, now you also know that you don’t even have to marinate for too long to get those flavorful benefits.

Watch Chef Yankel break down his favorite marinades for chicken, pork, and beef here. In the video below check out an easy steak marinade — that has very little prep time —featuring garlic, cilantro, lime zest and olive oil. According to Yankel, that’s all you need for a delicious steak every time.

Also, here is Chef Yankel’s favorite one-hour steak marinade recipe for grilling New York strip steaks:

  • 3 limes, both zest and juice
  • 1 bunch fresh cilantro, chopped
  • 1 head of minced garlic
  • 1 tablespoon black pepper
  • 1/4 cup olive oil
  • 1/4 cup parsley, chopped
  • 1/4 cup chives, chopped
  • 4 tablespoons tarragon, chopped
  • 4 tablespoons dill, chopped
  • 2 tablespoons whole grain mustard
  • 1 tablespoon dijon mustard
  • 1/4 cup white wine vinegar
  • 1/4 cup olive oil
  • 1 tablespoon coarse kosher salt
  • 1 tablespoon fresh ground black pepper
  1. Combine all marinade ingredients in small bowl. Mix well and coat steaks thoroughly.
  2. Allow steaks to marinate in a refrigerator at least one hour, then bring steaks to room temperature before cooking.
  3. Grill the strip steaks over charcoal or an open flame for 4 to 6 minutes per side, or until internal temperature reads 120°F. Rest steak 8 minutes before serving.

You can find more recipes here. Happy eating!


beef cuts chuck short ribs

For grilling season — the best beef cuts from the chuck

Winter is slowly receding here in the Northeast, and it seems as if we’ve — finally — come to the end of a period of strange, colder-than-usual weather across the country. The Masters Tournament has come and gone. The selection of foods at farmers markets is more robust. Scarves, beanies, and mittens will soon be packed away.

And, most importantly, grills will reappear. They will be cleaned, repaired, and lit once more as we undertake that yearly rite of spring — cooking outside.

In our opinion, there is nothing that compares to the experience of throwing a scrumptious hunk of grass-fed beef over some hot charcoals or onto a red-hot grill.

But which beef cuts are best for cooking out? One section of the cow that has long been overlooked is the chuck, especially compared to the filet mignons, ribeyes, strip steaks, t-bone steaks, and tri-tips that come from the middle areas that make up the rib, loin, tenderloin,  and sirloin primal cuts.

As our ButcherBox Head Chef Yankel Polak says, “The chuck is a goldmine of great cuts.”

Some of the best cuts of beef to cook outdoors come from the chuck; also, some of our favorite steaks and roasts, in general, are chuck beef cuts.

You already know chuck beef

The “chuck” primal section produces the vast amount of meat that is used from a cow. Most of the meat from this area — the front section from the shoulder blade and down to the leg muscles — lacks fat and has a ton of connective tissue. Therefore, it can result in tough cuts of meat if cooked incorrectly.

Most parts of the chuck close to the ribs are used for various roasts.

Beef chuck roast, for example, is ideal for braising and slow cooking. Other common roast beef cuts from the chuck include pot roast and bone-in chuck roast, also known as the 7 bone chuck roast. These roast sections are fantastic when quickly seared and then put in a slow cooker for a few hours, especially with some complementary seasonings and spices.

These cuts are large and used for braising mainly because it is easy to cut sizeable hunks of beef out of the chuck section, but also because the connective tissue caused by the overuse of the muscles don’t make them as tender and marbled as sirloin steaks and tenderloin steaks.

However, many of the standard — sometimes vaguely labeled — steaks you can get at the supermarket are likely to be steaks cut from the chuck. Like flank steaks or skirt steaks, chuck is also often used as stew meat, kabobs, and sandwich steaks, and as an alternative to more expensive cuts like sirloin tips, tip roast, and ribeye.

You likely cook chuck meat on your grill quite often without realizing it: Chuck meat is one of the primary sources that butchers use to make ground beef. So if you are cooking cheeseburgers for the family this weekend, there is a good chance you’ve got some ground chuck in the burger mix.

SeeOurPlans2

New beef cuts from the chuck primal

Because chuck beef has primarily been used for braising roast cuts, cheaper cuts of steak, and ground beef in the past, some steak lovers believe that you can’t find quality steaks in this front section of the cow.

However, over the past few decades, the beef industry has innovated and uncovered tasty, tender steaks in the chuck section that were previously unknown, difficult to access, or more prevalently used in unique ways in other cultures.

For instance, as part of the Beef Checkoff Program, meat science researchers at the University of Florida and the University of Nebraska identified new and potentially more affordable tender cuts of meat. The project led to the discovery of little-used or unknown cuts, like the Denver steak.

The Denver steak — which does not officially have anything to do with the Mile High City — comes from the chuck flap, an area of the chuck under blade that is full of tough, connective tissue. This steak is delicious as long as it is cooked correctly and, as we’ve said again and again with these types of cuts, must be cut against the grain once cooked.

The beef industry research project also led to the discovery of the flat iron steak, which is a challenging cut to find from the top section of the chuck shoulder. Flat iron steak is a perfect grilling steak; it is tender and tasty when cooked on an open fire. However, it can easily become tough if overcooked. Similar to many other cuts with lots of connective tissue — like the Denver steak — it should also be sliced against the grain.

The Denver steak and flat iron steak aren’t the only great grilling cuts that come from the chuck. Additionally, the chuck eye steak comes from an area of the chuck that is part of the longissimus dorsi muscle, the same place where the ribeye steak is derived. There is some confusion about whether or not a chuck eye is also a Delmonico steak, but that is a subject for another day.

The most delicious of all the chuck cuts might be a surprise

Although it sounds like it should come entirely from the ribs primal, the best short ribs come from the chuck. The first few ribs of a cow — usually the second through fifth ribs — are where the serratus ventralis muscle is thickest. This area is in the chuck primal section. The meat in this section is often tough, which is why short ribs are best cooked over a long period of time with a good marinade or rub.

Culturally, short ribs have been prominent in East Asian and Middle Eastern cooking traditions. However, they have emerged more recently as a delectable treat in the U.S. and can be cooked in a number of ways.

Chef Yankel describes short ribs as “the kings of the braising cuts.” We love slow cooking them bone-in with a sweet marinade.

“Short ribs are packed with healthy fats and collagen,” Chef Yankel added. “Nothing compares for texture and flavor.”

Many of the chuck cuts mentioned above are featured in our monthly grass-fed beef ButcherBox — if you are a member, you’ve likely experienced some of these steaks and roasts. If you want some more on our favorite cooking methods and recipes for the different cuts of chuck mentioned, check out our recipe page or YouTube channel.

If you aren’t a member and would like to become a ButcherBox member with delicious, thoughtfully-raised grass-fed beef delivered to your door each month, click here.

pounding chicken breast

For the best, perfectly-cooked chicken, the key is pounding chicken breast thin

When I was a senior in high school, I had some free time on my hands. At this point in my life, I didn’t love school and had no college plans, so I got a job at a restaurant near my house.

It was a tiny restaurant; it had ten tables in total, maybe.  But it was famous for its schnitzel.

If you aren’t familiar with the dish, a schnitzel can be any type of meat — usually, veal, pork, or chicken — that is pounded thin with a meat tenderizer, breaded, and fried. It’s likely you’ve heard of the traditional Austrian dish Wiener Schnitzel, which is thinned and fried veal. 

The restaurant I worked at during those formative years as an apprentice chef was highly-regarded for its take on chicken schnitzel.

To make the dish, we had to take chicken breasts and pound them paper thin. We then breaded the thin chicken in heavily seasoned flour, egg, and dried challah breadcrumbs. Then, we fried them golden brown in skillets of bubbling oil.

The first time I took a bite of schnitzel, my life changed forever.

Up to that point, chicken had been mundane for me; it was just another all-too-common menu item, often barbecued on the grill at home. I couldn’t believe chicken could taste so good after that first schnitzel bite.

The wizened alcoholic chef who worked in the kitchen took time to teach me the process between his regular temper tantrums and naps on the old leather couch in the basement of the restaurant. The key, he said, was pounding the chicken breast to a perfect thickness. Not falling apart, but thin enough to cook quickly before the breadcrumbs burnt.  Thick enough to retain some moisture but thin enough to be cut with a fork. 

To get that perfect thinness by pounding chicken took some practice; I still remember the meat mallet we used, textured on one side and smooth on the other. To get the chicken breast to the right thickness, I covered the cutting board completely with several layers of plastic wrap. Then I made a blanket of plastic wrap that would go over the chicken breast by folding the film over itself five or six times. The plastic blanket does two things: It helps keep the flying chicken pieces to a minimum, and it helps distribute the impact of the meat mallet more evenly.

Rather than tenderize and pound a whole chicken breast — which can be quite thick — I sliced it down the middle, so I had two thinner breasts. Placing one of the thinner sliced breasts on the board, I covered it with the second layer of plastic. First, I’d give it a couple good smacks with the textured side of the mallet to soften it up sufficiently. Flipping the mallet, I would then continue pounding it until I had the perfect thickness.  

Pounding chicken thin is a vital process to prepare chicken for a lot of dishes that require boneless chicken breasts. If the step is skipped, it will result in uneven cooking when baking, grilling, or frying chicken. Dishes like chicken piccata, chicken marsala, schnitzel, chicken parmigiana, and chicken and waffles are just a few of the many popular chicken dishes that benefit from the pounding method to achieve a delicious texture and flavor.

Pounding a chicken breast paper thin, marinating it in an herb-and-spice-heavy marinade, and then grilling it is one of my favorite ways to grill white meat. Because of the thickness, it cooks in a minute or two; so fast that it never has time to dry out. Also, the grill and marinade make more contact with the meat because there’s so much more surface area. Pounding a chicken breast thin is a great way to cook chicken for sandwiches or to be sliced on salads, too.

Really, there are so many ways to use this method!

So get practicing and try one of our many ButcherBox chicken breast recipes. Or check out one of my recipe or how-to videos on YouTube.

pounding-chicken

chicken and waffles

Chicken and waffles: A history and our easy recipe

Don’t miss our ButcherBox recipe for “Buttermilk Fried Chicken and Gluten Free Waffles (Organic Free Range Chicken)” at the bottom of the page.

Many of our favorite modern dishes are the product of culinary cultures colliding.

“Pizza Margherita,” a flatbread that featured tomatoes and cheese, is believed first to have been served in Naples, Italy in the 18th century — only after the introduction of tomatoes from America. Cheeseburgers are the result of German-American immigrants taking a traditional “Hamburg steak” and placing it on bread for convenience. Spaghetti noodles’ arrival in Italy by way of China, Korean tacos with kimchi and bulgogi…the combinations are endless.

Which brings us to the fantastic delight that is “Chicken and Waffles.”

Fried chicken — boneless or not — piled on top of a fluffy waffle with some melted butter and maple syrup is as American as it comes.

First, having bacon, sausage, and ham — or Canadian bacon — isn’t enough for us, so we had to come up with a new way to jam some more meat into our breakfast. Innovation!

Second, even though a breakfast food, we’ve found a way to incorporate chicken and waffles beyond the diner. It has evolved into something with a bit more cache than your standard quiche or breakfast burrito. For instance, chicken and waffles is a regular pass around dish at many cocktail events these days. At places like the Lower East Side’s Root & Bone and Brooklyn’s Sweet Chicks in New York, the dish can be found on dinner menus for between $17 and $25. Boston’s well-known Myers + Chang features their own take on chicken and “ginger” waffles, which is one of the hotspot’s more popular dishes.

History of “Chicken and Waffles”

Before digging into the background of this delectable combo, first we need to trace the origins of waffles and fried chicken in the U.S.

According to lore, waffles in America can be traced back to the arrival of the Pilgrims in Plymouth. As the story goes, the Pilgrims were introduced to the dish while exiled in Holland before heading to the New World. Waffles became more prominent after the Dutch populated what is now New York, bringing with them “wafles.” However, the figure credited with the widespread popularity and acceptance of the breakfast treat in America is none other than founding father Thomas Jefferson, who is believed to have brought one of the first waffle irons to the U.S. after discovering the apparatus in France.

The story of fried chicken’s birth in the U.S. is more complicated and entwined with the history of slavery in the South. A recent Atlantic feature, “As American as Fried Chicken,” does better than I could at digging into the complex background of the dish and its place in soul food traditions.

How Southern soul food and Dutch/Belgian culinary traditions came to be conjoined in one delicious dish is not necessarily agreed upon by food historians. Some point to the popularity of something known as Dutch “waffle frolics” in the South, at which African-Americans fused many of their cultural cooking traditions — including spiced chicken — with waffles or pancake-like crepes. Others believe that jazz-age Harlem was the birthplace of chicken and waffles as we know the dish today.

There is also another completely separate tradition of Pennsylvania Dutch chicken and waffles that uses a pulled or stewed chicken dinner as opposed to fried chicken piled on top of waffles with gravy.

While the origins are disputed, the popularity of the dish is undeniable.

How to cook “Chicken and Waffles”

These days, you can find many different takes on chicken and waffles. In Nashville, the dish is combined with the city’s signature “hot chicken,” and versions of chicken and waffles with Buffalo chicken can be found at gastro pubs and restaurants in almost every city in America. Chicken and waffles with chocolate, gravy, variants of maple syrup, hot sauce, and more are widely available, and recipes abound for the dish. You can use a whole chicken, chicken tenders, or chicken breast, and can prepare it southern chicken-style or how ever you wish. Just make sure your chicken is golden brown and that you follow a fluffy, crispy waffle recipe.

Our in-house ButcherBox chef Yankel Polak has his own take on the dish. His “Gluten-Free Chix ‘n Waffles” recipe is one of the most popular among our ButcherBox recipes. You can check Chef Yankel out in the video below and find the recipe at the bottom of this page.

Chef Yankel suggests pairing this delicious, healthy dish with “a smoky maple syrup for the ultimate flavor bomb.” And make sure to have your waffle iron and a Dutch oven or a deep skillet handy!

Chef Yankel’s Buttermilk Fried Chicken and Gluten Free Waffles (Organic Free Range Chicken)”

Prep time is about 30 minutes and cook time 40 minutes. This recipe serves six.

Ingredients:

  • 1 ButcherBox Whole Chicken, cut into 10 pieces

Marinade

  • 3 cups buttermilk
  • 1 tsp dry thyme
  • 1 tsp dry sage
  • 1 tsp garlic powder
  • 1 tsp onion powder
  • 1 tsp paprika
  • 1 tsp black pepper
  • ½ tsp cayenne pepper
  • 1 Tbsp kosher salt

Coating

  • 2 c almond flour
  • 6 eggs, beaten
  • 3 c gluten-free 1-1 flour
  • 2 Tbsp kosher salt
  • 1 Tbsp black pepper
  • ½ tsp cayenne pepper
  • 1 c coconut oil, for frying
  • 1 c ghee, for frying

Waffles

  • 2 eggs
  • 2 c gluten-free 1-1 flour
  • 1 ¾ c milk
  • 4 tsp baking powder
  • 2 tsp kosher salt
  • ½ c coconut oil
  • ¼ c chives, chopped
  • 1 Tbsp maple syrup
  • 1 vanilla bean, just seeds

Directions:

Marinade

  1. Place chicken pieces in a large or medium bowl with buttermilk and all marinade ingredients. Mix well, cover and refrigerate for 8 – 24 hrs.

Fried Chicken

  1. Place 1 c ghee and 1 c coconut oil into Dutch oven. Place on medium flame and preheat oil to 350°F.
  2. Place almond flour, egg and 1-1 flour in 3 separate dishes.
  3. Remove chicken from buttermilk mix and place on wire rack to drain.
  4. Gently coat each piece of chicken, first in almond flour, then egg, then 1-1 flour and set on pan.
  5. Preheat oven to 350°F.
  6. Place 4 pieces of chicken in fat and fry for 2-3 min on each side or until lightly golden brown. Move to baking sheet. Repeat for remaining chicken.
  7. Place chicken in the oven and continue to cook until thermometer inserted into thickest part registers 165°F, about 20 min.

Waffles

  1. Crack eggs in medium to small bowl and whisk until frothy, about 3 min.
  2. Add remaining waffle ingredients and whisk gently until just mixed. Don’t overmix the batter – it should be chunky!
  3. Grease waffle iron and cook waffles as directed or until golden-brown.
  4. Serve with your favorite maple syrup and a little sriracha or other hot sauce!  


ClickHereForMore1

ribeye roast

Ribeye roast – For special occasions, Sunday dinner, or anytime

Don’t miss a special Ribeye Roast recipe from ButcherBox Head Chef Yankel Polak at the bottom of this post.

Here at ButcherBox, we believe the best way to bring friends together is over a delicious cut of grass-fed, grass-finished beef.

Our favorite cut to share with others is the ribeye roast. Perfectly-cooked, the ribeye roast goes well with an array of side dishes, red wine, and good friends.

What exactly is a ribeye roast?

Ribeye roasts — and ribeye steaks — come from the rib section of the cow, as the name implies. Specifically, ribeye roasts come from between the sixth and twelfth rib. It is a well-marbled section of muscle that is comprised of the longissimus dorsi, complexus, and spinalis muscles of a cattle. Ribeyes come in a number of different cuts and go by a few different names.

Most ribeye roasts are large, boneless cuts that have generous marbling and are best cooked over a few hours time. Traditionally the cut was used only on special occasions; a beef ribeye roast would be coated with salt and ground black pepper, spend an entire day in a roasting pan, and then be sliced up and presented as Sunday dinner or the centerpiece of a holiday meal.

Some roasts come with the bones included, and in this form is called standing rib roast and sometimes prime rib. It can also, confusingly, be called prime rib without the bone, and to add a level of complexity can be referred to as a roast beef mainly because it is beef roasted in an oven. (Check out our piece on often confused cuts for some clarification on the difference between prime rib roast and ribeye steak.)

The ribeye can be cut into steaks and cooked on a grill — with or without the bone — and has enough fatty, flavorful marbling that it needs little more than a pinch of sea salt and black pepper to make it a tender, mouthwatering treat.

A section of the ribeye can also be further cut down into a hard to find cut of steak known as the ribeye cap. The cut comes from the most tender part of this large muscle known as the spinalis dorsi that is highly-sought-out by discerning steak aficionados. The cut also goes by other names across the globe, including “Scottish fillet” in its boneless steak roast form.

Enough about the details of the ribeye, let’s get to the important stuff: How to prepare a delicious ribeye roast.

BBClickHere

How to cook a ribeye roast

You can order ribeye steaks from a butcher, or cut up a ribeye into steaks if you don’t want to put effort into roasting the cut. However, putting a little time and effort into the roast will pay off in the form of smooth, rich, well-marbled beef that you can easily slice up and serve to a number of dinner guests.

According to our Head Chef Yankel Polak, our ButcherBox boneless ribeye roast is a “breathtakingly marbled and tender hunk of meat.”

It can be prepared in numerous ways. For example, you can cook a ribeye roast in a slow cooker with some spices like fresh rosemary, minced garlic, and some vegetables. However, ribeye roast can be a bit too expensive to cook in this manner. “Pot roast,” beef usually tenderized by a day spent in a slow cooker is best with tough, less inherently flavorful cuts like chuck roast and shoulder steaks.

Below is ButcherBox Chef Yankel’s “Super Easy Ribeye Roast With Roasted Mushrooms and Eggplant.” This recipe serves eight, takes 20 minutes to prepare, and after two and half hours of cooking time, you’ll have a tender roast. It is quite simple and the perfect way to show off your cooking skills and delicious ButcherBox grass-fed beef.

The key is Chef Yankel’s use of a reverse-searing method, which allows you to sear the ribeye roast and let sit until it needs its final 15 minutes of cooking.

According to Chef Yankel, this will give you a medium-rare roast with a delicious brown crust. Also, he says, “This recipe won’t keep you stuck in the kitchen all night if you have guests.”

Super Easy Ribeye Roast With Roasted Mushrooms and Eggplant

Ingredients:

Beef Rub:

  • 1 ButcherBox Ribeye Roast
  • 3 Tbsp kosher salt  
  • 2 Tbsp garlic powder
  • 2 Tbsp onion powder
  • 2 Tbsp paprika
  • 2 Tbsp olive oil

Roasted Mushrooms and Eggplant

  • 2 lbs mushrooms, assorted variety, cut into similar size pieces
  • 4 Japanese eggplants, halved lengthwise
  • 6 garlic cloves, minced
  • 2 shallots, minced
  • 3 Tbsp fresh thyme, chopped
  • 3 Tbsp fresh parsley, chopped
  • 4 Tbsp extra virgin olive oil
  • 2 Tbsp sherry vinegar (or red wine vinegar)
  • salt and pepper to taste

Directions:

  1. Mix all ribeye rub ingredients and rub all over ribeye roast. Refrigerate on lowest shelf uncovered overnight. Remove from fridge 1 hr before roasting.
  2. Preheat oven to 250°F. Roast ribeye in a roasting pan until meat thermometer inserted into thickest part reads 115°F. Remove from oven and let rest for at least 20 min. The ribeye can sit out up to 2 hrs or be refrigerated until Step 7. If refrigerating, make sure to bring the ribeye back to room temperature before reheating.
  3. Preheat oven to 425°F.
  4. Mix all ingredients for the roasted vegetables except for the vinegar, then spread the vegetables evenly on sheet pans in a single layer.
  5. Roast vegetables in oven until lightly browned. Eggplant should be tender and mushrooms should shrink to half their original size.
  6. Remove vegetables from oven, sprinkle with vinegar and set aside.
  7. Place roast back in the oven and cook for an additional 15 min, until internal temperature is 125°F and the top is browned and crisp.
  8. Let ribeye roast rest for at least 20 min before carving. Happy Eating!

You can also check out Chef Yankel going through the steps of cooking a “Pan Seared Ribeye with Potatoes and Mushrooms”:


bacon-wrapped filet mignon

A bacon-wrapped filet is one of life’s simple joys

Why bring bacon and filet mignon together?

Of course, it makes sense. It seems like a question that does not need to be asked by any sane person. Crispy bacon and a delectable, tender steak together?

But, have you ever paused, mid-savory bite, and just momentarily think, who thought of THIS?

Believe it or not, there is a pretty good reason why it’s a good idea to wrap a filet in bacon.

Why do we wrap filet mignon in bacon?

Filet mignon comes from one of the least fatty parts of a cow, which is the reason it is so tender. However, this can also be a reason why some folks don’t like filets as much as, say, a well-marbled ribeye. The lack of fat also means a lack of some of the flavors that we — as a steakhouse-packing public — have come to love.

Wrapping a filet in bacon allows for some of the savory, smokey goodness inherent in bacon to seep into the filet when cooking. The fat also burns off the bacon, creating a crispy sear when grilling or cooking in a cast iron pan, or other stovetop methods.

Filet mignon, a lean cut from the little-used tenderloin section of a cow. It has little to no marbling, or intramuscular fat, due to its lack of use. Grass-fed cattle, however, do produce filets with some unique marbling and depth that isn’t found in grain-fed and finished cows. Butter, ghee, or some other fatty dairy product like blue cheese is often added when cooking to up the fat content and flavor.

As filets are often grilled, seared, or roasted, adding fats is vital to keeping the cut moist and tender. If it is cooked without added fats like butter or bacon, a filet can quickly dry out.

No one wants to waste a spectacular — and pricey — cut of beef like filet mignon by cooking it wrong.

How to cook a bacon-wrapped filet mignon

A grilled bacon-wrapped filet is a spectacular treat and is relatively easy to pull off — cook on high-heat for between four to six minutes on each side, and let it rest for 5- 10 minutes to get a perfect medium-rare finish.

However, searing and roasting is — in many people’s minds, including our ButcherBox Head Chef Yankel Polak —  the best way to approach a filet mignon to get the most delicious results.

According to Chef Yankel, a meal centered on a filet mignon wrapped in bacon is, “Romantic and luxurious.” 

“It is the perfect dinner for an indulgent night in,” he adds.

Below is the recipe for Chef Yankel’s bacon-wrapped filet recipe with buttermilk mashed potatoes and a mushroom wine sauce. Yankel’s recipe calls for wrapping a couple of ButcherBox filet mignons in ButcherBox bacon, which you can do with either a toothpick or butcher’s twine. You can also watch Chef Yankel lead you through this bacon and filet delight at the bottom of the page.

bacon-filet

Bacon-Wrapped Filet with Buttermilk Smashed Potatoes and Mushroom Wine Sauce

This recipe serves two people. It takes five minutes to prep and 40 minutes to cook. 

Ingredients:

  • 2 ButcherBox filet mignons
  • 4 strips ButcherBox bacon
  • 2 c small multicolor potatoes
  • 3 Tbsp salt for boiling potatoes
  • ¾ c buttermilk
  • ¼ c butter for potatoes
  • ¼ c chives
  • ½ c dry red wine
  • 1 cup assorted mushrooms, cleaned and quartered
  • ½ c heavy cream
  • ghee or avocado oil for searing
  • 2 Tbsp butter for basting
  • salt and pepper to taste

Directions:

  1. Place potatoes in a pot, cover with salted cold water and bring to simmer. Cook until fork-tender.

  2. Drain water and add buttermilk, butter, chives and gently smash potatoes until buttermilk and butter are fully absorbed. Season with salt and pepper.

  3. Season filet mignons on both sides with salt and pepper.

  4. Preheat oven to 375°F. Lay two strips of bacon side by side with a tiny bit of overlap. Lay filet on top of bacon as though it was a wheel and roll up bacon around the filet. Secure with two small pieces of string each tied around one strip of bacon. Repeat for the second filet.

  5. Preheat cast-iron pan, add ghee or oil, and sear filets on all sides, 2-3 min per side. Add remaining butter and baste for additional 2 min on all sides. Place pan in oven and roast for 8-10 min.

  6. Remove pan from oven when the thermometer inserted into the center of filet reads 120°F. Set steaks aside.

  7. Place pan on stove top on medium heat. Add mushrooms to pan and sauté in pan juices for 3 min.

  8. Add red wine and cook until liquid is reduced by half.

  9. Add heavy cream and cook until liquid is reduced by half again, stirring every min or so.

  10. Serve filet over potatoes and top with mushroom wine sauce.

Happy Eating!

braised beef braising meat

How to braise beef and why it’s one of the best cooking methods

Whenever I come across braised short ribs on a restaurant menu, I have a hard time passing up the delectable dish. Just thinking about it, I can taste the melt-in-your-mouth, flavorful meat. In all my short rib adventures, I’ve never stopped to wonder how chefs create such divine creations.

The secret, I discovered comes down to braising.

A cooking method mixing high dry heat, low moist heat, and time

Braising is a two-step cooking method that uses both high-heat for a short period and low-heat for a longer period of time. First, it involves browning meat in olive oil, butter, ghee, or some other fat — on high heat — usually by sauteing in a pan. Second, the meat is cooked in a covered dish, in the juices left from the browning and often also with an added liquid such as stock, water, etc.

The second, slow-cooking step is done in a tightly covered pot, like a dutch oven, or, often, in a slow-cooker. This process is also sometimes referred to as “pot roasting.”

Slow-cooking — and, well, the use of a slow-cooker or Crock Pot — helps to add flavor and tenderizes tougher cuts of beef and other meats.

According to The Kitchen Encyclopedia, published in 1911, “Braising is a method much used in France, and is a cross between boiling and baking.” The word itself derives from the French word brasier, which is a form of braise, meaning “live coals.” A brasier or brazier, in French and English, is also another name for a receptacle to burn coal or charcoal. Dutch ovens can also be called brasiers. The origin of the term braising seems to come from a French word for a method using both dry heat and moist heat.

Why braise?

Braising can be done with any meat but is most often done with tough cuts of meat, because tender cuts usually don’t need additional tenderizing or flavor.

Cuts that traditionally have less flavor — say a chuck roast, shoulder steak, chuck pot roast, pork butt, or beef chuck arm — are the best cuts to use and may need richer braising liquids. The best way to add great flavor is with beef broth or chicken stock, as well as spices like rosemary, bay leaves, and other fresh herbs. Moreover, braising done in the style of a pot roast can include aromatic vegetables — carrots, onions, and more — for additional flavor.

How to braise meat

The first step of braising takes about ten minutes, but achieving truly fall-apart-tender meat takes many hours of cooking time. Our in-house ButcherBox Chef Yankel Polak recommends seasoning the meat with salt and black pepper, then searing your meat until you get a nice brown crust. When cooking pork, he likes to use apple cider as a braising liquid that can also help scraping the browned bits of meat left from searing. Chef Yankel also recommends adding tomato paste to your braising liquid for texture and taste. For added flavor and simplicity, he also advises using the same pot to sear and cook, covering the dish after the flavorful liquid and browned meat have simmered.

A long, slow cook is crucial for breaking down the proteins and tenderizing the meat. You’ll need to cook for at least an hour and a half to two hours (depending on the size of your cut of meat) in the oven set to 300 degrees. Cooking on low heat allows the meat to cook slowly as the braising liquid evaporates. It is this process that makes dishes like pulled pork, carnitas, and roasts fork-tender.

Whether cooking pork in the slow cooker or keeping a watchful eye on a roast spending a day in a Dutch oven, meat braising in its juices and spiced-up flavor can turn a simple cut of beef or pork into a truly amazing dish.

You can find some of Chef Yankel’s favorite recipes to braise beef, chicken, or pork here, or watch the video below for more braising techniques.

If you want more from Chef Yankel, check out his recommendations for the best red wine to pair with braised beef and other dishes. 

Our monthly ButcherBox comes often comes with cuts like pork butt and grass-fed beef roasts that are perfect for braising. You can also get these cuts in a custom ButcherBox. If you’re not a member already, you can sign up here.