Tag Archives: balsamic

easy new york strip steak

Easy New York Strip Steak

Chef Yankel and the ButcherBox Kitchen are excited to share not only the best, easiest way to quickly cook a New York strip steak, but a way to get a perfectly tender NY strip from frozen.


TRANSCRIPT:

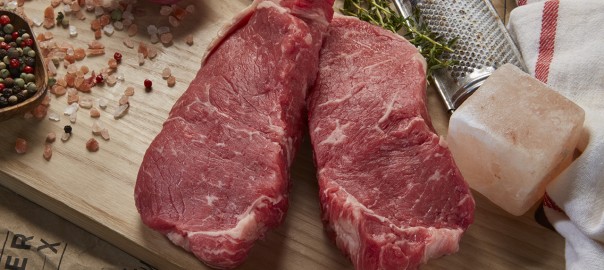
Hey there, I’m Yankel. And today I’m going to show you how to make the absolute. Perfect, New York strip steak. Plus five ingredients and you’re going to get a beautiful pan sauce out of it. Now. We’re doing it from Frozen. So let’s check out our steak in the freezer.  Well, there is a beautiful New York strip rock-solid.

We’re going to head over to the sink. And what we’re going to do is just defrost the surface of it while we do some of our prep.

I’m going right into the sink in a bowl. I want it submerged in cool running water. So we’re going to fill it up.  Now, I know I said from frozen. You’re probably wondering what’s he doing? It? Looks like he’s defrosting it.  All I want is the surface defrosted enough for it to hold some salt and pepper.

That’ll take a few minutes while we let the water trickle. We’re going to head over to the counter and we’re going to slice up some of our ingredients we get everything ready in advance. I have to make more flavors maybe even complete dishes. So since we’re doing a New York strip steak in a cast-iron pan, I thought why not add a couple of other ingredients to make it extra delicious.

So we’re going to do some mushrooms. Just a nice little handful, and all I’m going to quarter them. And then we’re going to do a quickly sliced onion, and at the very end right before we go into the oven with our steak, we’re going to add a splash of balsamic vinegar and that’s going to give us a little bit of a pan sauce because we’re going to actually baste the steak with butter and garlic. All that’s going to come together plus the juices from the mushrooms, and that’s really what I want to capitalize on here.

They give off a nice amount of liquid, I want to turn that into something magical. So I got my onion, I’m just gonna take the ends off.  And I think we’re just going to go with half an onion for this recipe. I can use the other half for whatever my next project is. Quick tip about slicing onions,  onion has rings that go in a certain direction. I just want thin slices. So I’m going to let the onion and the shape of the onion do most of the work for me and just cut against those rings.

I’m going to use the garlic when I baste the steak, so I don’t want to mince it too much. I’m just going to go with semi-thin slices that way it won’t burn when it’s in that hot pan. Oh, goodness.  It’s either nostalgia. or onions and garlic. It’s generally my excuse. All right, I think our steak has enough surface texture to absorb some seasoning.

So I’m going to go grab it and then we’re gonna get started. But before I leave, I’m going to preheat my pan.  We’re going to go with medium-high heat because I want a good sear without burning. I’ve already got the oven preheated to 350°F. Now, before we get started one of the key points to getting a good sear on a steak is having a dry surface.

So what we’re going to do is open our package. I like to have a paring knife go right in on the edge.  Great. All right. We want to dry every bit of moisture on that surface because any moisture is going to steam and steam is going to slow down the searing process. So I’ve got some paper towels ready, and I’m just going to blot all that moisture out.

Dry surface. And you can see just enough give for it to hold salt and pepper. I’m going to set that down there, and we’re going to season it. Now when it comes to salt and pepper, not all salts are equal. I like to use coarse kosher salt that gives me a nice texture to work with and kosher salt really melts beautifully on the meat as it cooks. So it gives it really good seasoning.

Then, of course, fresh cracked black pepper has the best flavor. A good pepper mill will get you everywhere. We’re gonna flip that over. A nice coating. remember we’re only seasoning the outside of the meat so we want to make sure it has a nice even cover, that way every bite is flavorful.

Alright, our pan is hot. We’re going to go into the pan with some high-temperature oil. I’ve got avocado oil here, and it can cook at very high temperatures without smoking and it’s refined and what that means is that it has most of the impurities taken out of it.

If you’re using an extra virgin olive oil, you risk the impurity scorching and you get that burnt flavor. So a good high temp oil will go a long way. Lots of alternatives out there, coconut oil, peanut oil, some of the sunflower, safflower, and canola oils work well. It’s up to you.

As soon as we have a little smoke, which we should have it almost immediately because the pan has been preheating.

That’s ready to go. So we’re going to go with our steak right into the pan.

Now, the key here is good contact with the pan. We want every inch of that steak touching the pan because when we brown steak when we brown meat, that’s where the flavor happens. It’s called the Maillard reaction, and we are building flavor compounds. So don’t skip the browning step. Good surface contact. I press down a little bit.

Resist the temptation to move that steak around. The first two minutes are crucial for a good sear. Once we move it, we’re going to lose that contact. So we’re just going to let it sit there for two minutes and build up that crust.

We’re about ready to flip it over and you know the New York strip has that very distinctive line of fat along one side. So what I like to do is before I flip it. I’m actually going to turn it on its side and make sure that that fat has good contact with the pan. It’s absolutely delicious. But it needs a sear.

So we’re just going to press it in there.  Every inch of it, make sure it has a nice brown crust building and then we will flip the steak over and do the other side. That’s kind of what we’re looking for crispy fat. All right, we’re going to flip it over. There you go.

We’re gonna cook it for about a minute on this side and then we’re going to add butter and garlic and we’re going to baste it. Butter and garlic together is a magical combination, but butter has this characteristic of transferring flavor. So we’re really going to let the steak absorb that garlic flavor and basting it when you’re about three minutes into cooking is a perfect time for it to absorb all that garlicky goodness. 

Now what I’m going to do is move the steak to the top of the pan and get my butter foaming. And as soon as I see big bubbles from the butter, it’s time to start giving that’s steak a bath.

Always give your steak a nice bath.

I’m a butter and garlic lover.  And so I bathe my steaks in it. Perfect.

All right, we’re going to pull the steak out for just a minute and we’re going to saute our onions and mushrooms before putting our steak back in and putting everything into the oven.

Set that down right there onions go in, mushrooms go in.

Don’t need to cook it for long on the stovetop. We’re just going to stir it up and make sure it has every bit of coating that we for need maximum flavor. Now, we’re going to add a splash of balsamic.

We’re going to put our steak right back on top. We’re going to go into our preheated oven for about ten minutes; but we’re going to check it in three minutes, so we know exactly what temperature it is so we can track it better. Remember grass-fed beef can cook a little bit faster than normal. So pay attention.

A few minutes into cooking. I want to temp the steak. I like to gauge where it’s at and that will help me decide how much longer it’s going to need exactly. So we’re looking at okay 90 degrees to me that means five or six more minutes. The temperature tends to rise much more quickly. Once it passes a 100°F.

I think we’re just about there. So we’re going to give it one more temp.

That’s perfect. We’re looking for 115°F and rising, under 120°F, and I’ll tell you why.

Meat does this thing where it continues to cook even after you’ve taken it off the heat.  It will rise at least 5°F and maybe even 10°F depending on how hot it is and how much time we let it rest. So, it’s going to finish cooking and I’m going to move it to the cutting board, so it doesn’t have any more heat hitting it.

We’re going to leave it there eight minutes in that time. It will rise to at least 5°F. It’s, in fact, getting hot or not colder. If we want to keep the surface hot as well, we’ll loosely tent it with foil, just so it can breathe a little bit. In the meantime, we can reduce a little bit of that liquid for our sauce.

It’s going to cook down real fast. It’s going to be absolutely delicious all those flavors come together. The mushrooms just give off all the liquid we needed for a sauce. The butter, the balsamic, the onions also give off a lot of moisture. So all together, we’re just taking all that liquid and turn it into something absolutely magical.

And of course, I never miss an opportunity to add a little bit more seasoning. So I’m just going to get a little bit salt and one quick grind of fresh ground black pepper.  As the moisture burns off you’re going to see the bubbles in the pan begin to get larger. As they get larger, the sauce is actually going to come together.

And that’s when we’ll know it’s done. So right now, we have little bubbles. Bigger bubbles mean we’re exactly where we want it to be.

Smells so good.

Beautiful. Well, we’re going to let that steak rest for a few minutes. We’re gonna let the pan simmer. Let’s just give it low flame. All right our steak has rested long enough. We’re gonna slice into it.

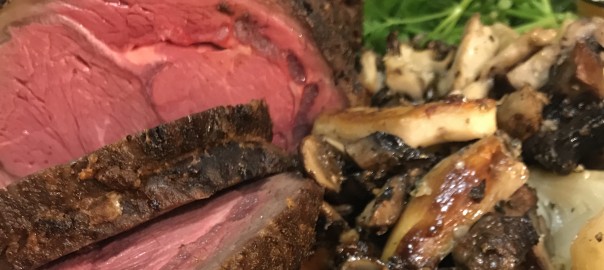
Now when it comes to New York strip, there are two things to take into consideration. One is that beautiful strip of fat, which I love to eat, but I’m going to take off in order to slice. So we’re just going to slice that strip of fat right off and set it aside. Gorgeous. You can already see that steak is perfectly cooked.

Now, we’re going to slice it right down the middle. Like so. And then we’re going to slice it against the grain because it’s going to be crazy tender when we do that. It’s already a super tender steak. Slicing against the grain makes it even more tender.

Yeah, it doesn’t get any better than that. From frozen. Perfect. Medium-rare. Super juicy. That’s good stuff. Well, it looks like it rested the perfect amount of time. You can always tell from how much moisture is left on the board. Not much in this case, which means every bite we get is going to be crazy juicy.

So I’m going to put that right onto my plate, and then we’re going to top it off with our mushrooms, onions, and balsamic.

And now we have these beautiful roasted mushrooms and onions, packed with flavor.  Absolutely gorgeous. We’re going to go right on top. It doesn’t take time, generally uses ingredients you have sitting around the house.  Put it all into a pan together.  Sear it. Baste it. Throw it in the oven. Rest it. Eat it.

That’s the whole process. It’s so easy. I ‘m Yankel, go cook something from frozen.

pantry essentials

10 Pantry Essentials Every Cook Should Have

You may have taken the first key step towards a month of great eating and ordered a ButcherBox, complete with high-quality grass-fed beef, heritage pork, and free-range, organic chicken.

But do you know what else completes a kitchen? Pantry staples, like high-quality oils, a few kinds of vinegar, dried herbs, and more.

This guide details the pantry essentials that make all the difference when preparing the delicious meals at home. The essentials that all cooks have a hands-length from their stoves include condiments like assorted vinegars, Dijon mustard, and soy sauce or their gluten-free variants. With a few of these, you can make everything from vinaigrettes and dressings to sauces, rubs, and much more.

Other necessary kitchen staples include canned tomatoes, which add richness to stews and soups, and dried herbs like oregano, rosemary, and thyme.

The best part? None of these staples are prohibitively expensive, and your individual purchase will probably last you quite a while.

1. High-Quality Oils

You can’t cook many meals without a cooking fat, and while grass-fed butter, ghee, or tallow might be an option, you should always keep a solid selection of healthy, high-quality cooking oils at hand.

These oils might include high heat friendly options filled with healthy fats, like avocado oil or coconut oil. For lower heat preparations, a solid bottle of olive oil should always be handy. You can even use good olive oil as a finishing touch, like a drizzle over salad or hummus.

Neutral oils like avocado oil or olive oil are also excellent bases for homemade salad dressings, and, if you’re really looking to up your pantry game, keep finishing oils like sesame oil or walnut oil on hand.

2. An Assortment of Vinegar

A good vinegar will take a good dish to great, and thankfully there are many options to choose from.

If you need to add acidic sweetness, reach for balsamic vinegar. In fact, dousing some caramelized red onions with balsamic vinegar and sugar is a sure-fire way to make a quick and delicious topping for burgers and steaks, while aged balsamic vinegar makes the perfect coating for grilled veggies.

Don’t stop at balsamic vinegar. Champagne vinegar adds a sweet note to homemade vinaigrettes, while apple cider vinegar boasts so many purported health benefits it’s hard to keep count. You can even throw it into homemade barbeque sauce for a unique bite.

Even plain old white vinegar has its place in a pantry. It’s as useful for making crispy pickles as making homemade kitchen cleanser.

3. Dijon Mustard

Yellow mustard has its place, but nothing heightens a dish more than a dollop of Dijon mustard. The traditional French mustard is made with brown mustard seeds, white wine, and a verjus made from unripe grapes. This verjus is what gives Dijon mustard its distinct, tart flavor.

Use Dijon mustard in a homemade vinaigrette for a crisp salad, or as part of a rub for various cuts of meat. These rosemary brined pork chops are a perfect example.

The best part about Dijon mustard? While it sounds fancy, it’s a pretty affordable condiment, with the store brand bottles rarely costing more than $3 and the fancy stuff only clocking in at $5 or less.

4. Soy Sauce/Tamari/Coconut Aminos

What’s the best way to build umami into your dishes? Soy sauce, a sauce made from fermented soybeans, roasted wheat, and cultures, is the ultimate, inexpensive umami condiment.

Of course, many people question the nutritional impact of soy sauce. If you’re gluten-free, a specific type of soy sauce, tamari, can be made without gluten.

If you avoid soy and grains entirely, coconut aminos, a sauce made from coconut tree sap and salt, is a great alternative. While a bit less pungent and a tad sweeter than traditional soy sauce, it still packs umami flavor into dishes.

Use soy sauce or any of its alternatives in Asian-inspired fare, like this ginger pork noodle soup.

5. A Solid Hot Sauce

While the hot sauce category is vast, your favorite hot sauce is a kitchen essential. Why? Because it can be doused on most anything and elevates the flavor of whatever you’re noshing on.

Do you prefer Asian flavor profiles? Reach for the less hot, slightly sweet Sriracha, or pack in the chili garlic flavor with sambal.

Mexican and Latin America hot sauces are another great category: The options are many, but most sauces feature some kind of vinegary heat and potentially a kick of citrus like lime.

Channel pure Americana with Tabasco or Louisiana hot sauce. There are, literally, thousands of hot sauces to choose from.

Use your favorite hot sauce to jazz up a simple breakfast of eggs and bacon, or incorporate it into vinaigrettes and sauces for a little kick.

6. Dried Herbs

Like hot sauce, the selection for dried herbs is vast. And while it’s great to build out your spice cabinet and experiment with various herbs, there are a few essentials we’d recommend always having on hand.

Dried oregano, basil, rosemary, and thyme — commonly sold together as an Italian seasoning blend — lend bright flavors to any dish you whip up and are much more convenient in a pinch than fresh herbs.

Other dried herbs we’d consider staples include dill, which is perfect in anything from pickles to salads, and dried bay leaves, which lend depth to soups and stews.

If you’d really like to pad out your spice cabinet, add dried marjoram, ground coriander, dried mint, dried sage, and dried tarragon.

7. Coconut Milk

Canned coconut milk is a treasure, and not just because it’s suitable for most diets. The silky, fatty substance lends richness to any dish it touches, and won’t spoil as quickly as refrigerated alternatives like heavy cream or milk.

Despite it including coconut meat, coconut milk is a fairly neutral, non-dairy way to add creaminess and heft. Use coconut milk to add creaminess to soup, braise meats, or add silky texture and flavor to rice.

Pro tip: Stock up on cans of coconut milk. Whichever ones you don’t use for savory dishes, use them to make dairy-free sweets like no-churn ice cream.

8. Nut and Seed Butters

What’s your favorite? Peanut butter, almond butter, cashew butter, tahini? Whichever nut or seed butter you prefer, it’s bound to serve many uses in your kitchen.

You can, of course, use nut butters to spread on toast, add protein to smoothies, and bake up some delicious cookies. But nut butters have serious culinary uses, too.

Peanut butter or almond butter both make excellent Asian-inspired sauces, like in this Thai almond soba noodle salad. Tahini tastes delicious in Mediterranean fare. Try it drizzled over these Mediterranean meatballs.

9. Canned Tomatoes

Whether you’re whipping up a sauce for pasta, throwing some chili in the crockpot, or cooking up beef stew or pot roast low and slow, canned tomatoes are so useful.

You can find canned tomatoes in many forms, from canned tomato paste to whole, peeled tomatoes in a can. It’s good to have a variety of these options on hand for whatever you may need. They’re inexpensive and can add flavor to nearly any dish, like this fennel and tomato Italian pork shoulder.

10. Good Salt and Black Pepper

It’s a bit of a given that you should have salt and pepper on hand. It’s rare to not add it to a dish in the kitchen. But not just any salt or pepper will do.

Iodized table salt is the most common option, but it’s not exactly the healthiest one. It’s bleached, devoid of trace elements, and often contains additives. Also, it just doesn’t taste as good as sea salt crystals.

Sea salt comes from the ocean, and is evaporated to separate the salt crystals from the water.

(Another option: ButcherBox Chef Yankel always recommends having Kosher salt on hand for seasoning steaks.)

For pepper, whole peppercorns that can be cracked in a pepper mill lend the best flavor.

ribeye roast

Ribeye roast – For special occasions, Sunday dinner, or anytime

Don’t miss a special Ribeye Roast recipe from ButcherBox Head Chef Yankel Polak at the bottom of this post.

Here at ButcherBox, we believe the best way to bring friends together is over a delicious cut of grass-fed, grass-finished beef.

Our favorite cut to share with others is the ribeye roast. Perfectly-cooked, the ribeye roast goes well with an array of side dishes, red wine, and good friends.

What exactly is a ribeye roast?

Ribeye roasts — and ribeye steaks — come from the rib section of the cow, as the name implies. Specifically, ribeye roasts come from between the sixth and twelfth rib. It is a well-marbled section of muscle that is comprised of the longissimus dorsi, complexus, and spinalis muscles of a cattle. Ribeyes come in a number of different cuts and go by a few different names.

Most ribeye roasts are large, boneless cuts that have generous marbling and are best cooked over a few hours time. Traditionally the cut was used only on special occasions; a beef ribeye roast would be coated with salt and ground black pepper, spend an entire day in a roasting pan, and then be sliced up and presented as Sunday dinner or the centerpiece of a holiday meal.

Some roasts come with the bones included, and in this form is called standing rib roast and sometimes prime rib. It can also, confusingly, be called prime rib without the bone, and to add a level of complexity can be referred to as a roast beef mainly because it is beef roasted in an oven. (Check out our piece on often confused cuts for some clarification on the difference between prime rib roast and ribeye steak.)

The ribeye can be cut into steaks and cooked on a grill — with or without the bone — and has enough fatty, flavorful marbling that it needs little more than a pinch of sea salt and black pepper to make it a tender, mouthwatering treat.

A section of the ribeye can also be further cut down into a hard to find cut of steak known as the ribeye cap. The cut comes from the most tender part of this large muscle known as the spinalis dorsi that is highly-sought-out by discerning steak aficionados. The cut also goes by other names across the globe, including “Scottish fillet” in its boneless steak roast form.

Enough about the details of the ribeye, let’s get to the important stuff: How to prepare a delicious ribeye roast.

BBClickHere

How to cook a ribeye roast

You can order ribeye steaks from a butcher, or cut up a ribeye into steaks if you don’t want to put effort into roasting the cut. However, putting a little time and effort into the roast will pay off in the form of smooth, rich, well-marbled beef that you can easily slice up and serve to a number of dinner guests.

According to our Head Chef Yankel Polak, our ButcherBox boneless ribeye roast is a “breathtakingly marbled and tender hunk of meat.”

It can be prepared in numerous ways. For example, you can cook a ribeye roast in a slow cooker with some spices like fresh rosemary, minced garlic, and some vegetables. However, ribeye roast can be a bit too expensive to cook in this manner. “Pot roast,” beef usually tenderized by a day spent in a slow cooker is best with tough, less inherently flavorful cuts like chuck roast and shoulder steaks.

Below is ButcherBox Chef Yankel’s “Super Easy Ribeye Roast With Roasted Mushrooms and Eggplant.” This recipe serves eight, takes 20 minutes to prepare, and after two and half hours of cooking time, you’ll have a tender roast. It is quite simple and the perfect way to show off your cooking skills and delicious ButcherBox grass-fed beef.

The key is Chef Yankel’s use of a reverse-searing method, which allows you to sear the ribeye roast and let sit until it needs its final 15 minutes of cooking.

According to Chef Yankel, this will give you a medium-rare roast with a delicious brown crust. Also, he says, “This recipe won’t keep you stuck in the kitchen all night if you have guests.”

Super Easy Ribeye Roast With Roasted Mushrooms and Eggplant

Ingredients:

Beef Rub:

  • 1 ButcherBox Ribeye Roast
  • 3 Tbsp kosher salt  
  • 2 Tbsp garlic powder
  • 2 Tbsp onion powder
  • 2 Tbsp paprika
  • 2 Tbsp olive oil

Roasted Mushrooms and Eggplant

  • 2 lbs mushrooms, assorted variety, cut into similar size pieces
  • 4 Japanese eggplants, halved lengthwise
  • 6 garlic cloves, minced
  • 2 shallots, minced
  • 3 Tbsp fresh thyme, chopped
  • 3 Tbsp fresh parsley, chopped
  • 4 Tbsp extra virgin olive oil
  • 2 Tbsp sherry vinegar (or red wine vinegar)
  • salt and pepper to taste

Directions:

  1. Mix all ribeye rub ingredients and rub all over ribeye roast. Refrigerate on lowest shelf uncovered overnight. Remove from fridge 1 hr before roasting.
  2. Preheat oven to 250°F. Roast ribeye in a roasting pan until meat thermometer inserted into thickest part reads 115°F. Remove from oven and let rest for at least 20 min. The ribeye can sit out up to 2 hrs or be refrigerated until Step 7. If refrigerating, make sure to bring the ribeye back to room temperature before reheating.
  3. Preheat oven to 425°F.
  4. Mix all ingredients for the roasted vegetables except for the vinegar, then spread the vegetables evenly on sheet pans in a single layer.
  5. Roast vegetables in oven until lightly browned. Eggplant should be tender and mushrooms should shrink to half their original size.
  6. Remove vegetables from oven, sprinkle with vinegar and set aside.
  7. Place roast back in the oven and cook for an additional 15 min, until internal temperature is 125°F and the top is browned and crisp.
  8. Let ribeye roast rest for at least 20 min before carving. Happy Eating!

You can also check out Chef Yankel going through the steps of cooking a “Pan Seared Ribeye with Potatoes and Mushrooms”: